Ultimate Guide BEFORE Hiking The Annapurna Circuit Trek 2024
Ultimate Guide BEFORE Hiking The Annapurna Circuit Trek 2024
Featured On


If you’re in Nepal, you’re most likely here to do some trekking and there’s no trek more grand than the Annapurna Circuit that takes you up 5416m (17769 ft) and across 220 km (~137 mi) of mountains and villages in a circuit that begins in Besisahar and ends in Pokhara. After debating long and hard between Everest Base Camp and the Annapurna Circuit, I went with the latter and have no regrets.
Is The Annapurna Circuit Open in 2024?
Nepal is currently open to foreign visitors. Check your visa requirements beforehand, but for most countries, a visa on arrival is available.
How Long Does It Take To Complete The Annapurna Circuit Trek?
This classic Annapurna Circuit Trek hike used to take about 3-4 weeks to complete by foot with teahouses along the way to offer food and shelter for trekkers, but can now be done in less time. With the construction of new roads, that landscape is changing. For better or for worse, the trek can now be done in as little as 10-12 days. There are even trips that cut it down to 8 days, which I do not recommend.
Choose your adventure. This should help you figure out how long you should plan for it, the best time of year to go, and what to expect along the way. It’s a long read with a lot of useful information, so skip to whatever sections you need.
If you’re interested in other hikes besides the Annapurna Circuit, there’s a great guidebook with 14 of Nepal’s best hikes. Otherwise, keep reading for all information you need to plan your Annapurna Circuit hike.

Can You Hike The Annapurna Circuit Alone?
It may come as a surprise, but you can definitely and easily do the Annapurna Circuit hike solo. Not only is the path pretty straightforward, but it’s a lot easier nowadays with the aid of things like offline maps and GPS on your phone. Maps.me is a great app that allows you to download maps to use offline. Cellular and data reception has improved, especially around the villages, but it’s still hit or miss at times. You can read more about this below.
If you were the only person on the mountain and you had to do the Thorong-La Pass alone in the dark, I’d say you should be someone with some mountaineering experience. Fortunately, High Camp is always packed with hikers and guides (many of whom you’ve probably met and interacted with along the way there). Everyone is more or less doing the same thing and information is shared readily. Just follow the lead of another guided party.
Along the path are pretty well marked to get from one village to the next. You’ll see many people along the way, so if use your common sense and you can very reasonably do the Annapurna Circuit solo.
The Annapurna Circuit Loop Route
Trekkers can general begin their hike in the small village of Besisahar arriving by bus from either Kathmandu (6-10 hours) or Pokhara (2-4 hours). With the newly form dirt “road”, you can skip the first 9 km and take a jeep or van to Bhulbhule. From here, the trail is more or less restricted to foot powered transport. Villages are located every 3-5 km apart, some with just a teahouse or two while others are more of a full mountain village with more food and accommodation options.
Trekkers are advised to ascend slowly to acclimate taking in about 5-8 km each day passing from village to village.
The next few landmark villages are located at Tal (1700 km), Bagarchap (2160m), Chame (2710m), Lower Pisang (3250m), Manang (3540m), Yak Kharka (4050m) and High Camp (4850m) before making the climb to the Thorung La Pass, the highest point on the trek at 5416m.
Although there are recommended hiking itineraries, trekkers can make their own plans and decide to stop wherever they can find a teahouse with lodging. After the pass, it’s a sharp drop in elevation to Muktinath (3800m). From here, there are roads so weary hikers have the more options on how to continue from here. Jomson (2720m) has an airport and an exit option for those on a shorter 10-12 day itinerary. Those continuing can continue the last 80m from Jomsom to Pokhara via Tukuche (2590), Kalopani/Lete (2535m), Ghasa (2010m), Tatopani (1200m), Ghorepani (2870m) and Birethanti (1025m).
Annapurna Circuit Elevation Map and Villages
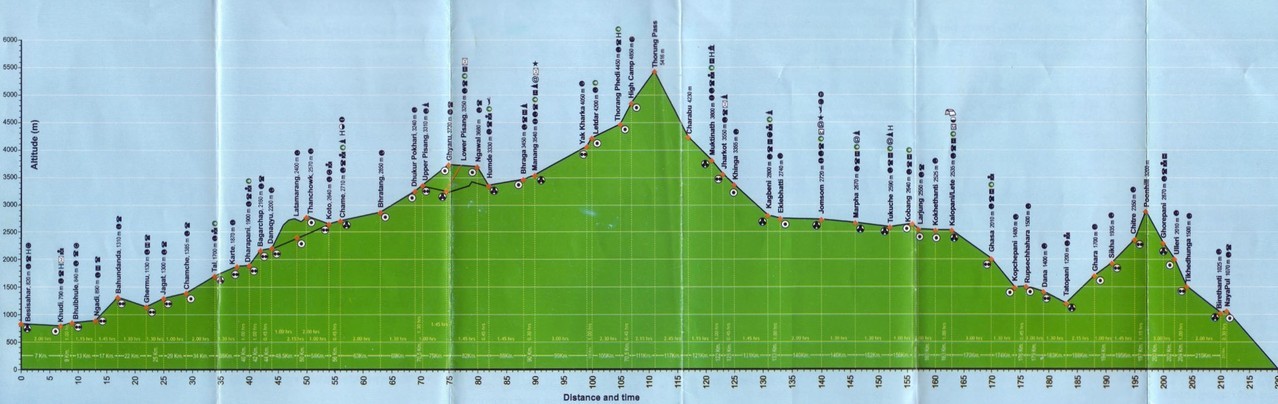
Guide To All Annapurna Villages And Teahouses Elevation and Distance
Name: Elevation / Km Marker
Besisahar: 820m / 0km
Khudi: 790m / 7km
Bhulbhule: 840m / 9km
Ngadi: 890 / 13km
Bahundanda: 1310m / 17km
Ghermu: 1130m / 22km
Jagat: 1300m / 25km
Chamche: 1385m / 29km
Tal: 1700m / 34km
Karte: 1870m / 38km
Dharapani: 1900m / 40km
Bagarchap: 2160m / 42km
Danaqyu: 2200m / 44km
Latamarang: 2400m / 48.5km
Thanchowk: 2570m / 50km
Koto: 2640m / 54km
Chame: 2710m / 56km
Bhratang: 2850m / 63km
Dhukur Pokhari: 3240m / 69km
Upper Pisang: 3310m / 70.5km
Ghyaru: 3730m / 75km
Lower Pisang: 3250m / 75km
Ngawal: 3680m / 80km
Humde: 3330m / 82km
Bhraga: 3450m / 88km
Manang: 3540m / 90km
Yak Kharka: 4050m / 99km
Letdar: 4200m / 100km
Thorang Phedi: 4450m / 105km
High Camp: 4850m / 107km
Thorung La Pass: 5416m / 111km
Charabu: 4230m / 117km
Muktinath: 3800m / 121km
Jharkot: 3550m / 122km
Khinga: 3355m / 125km
Kagbeni: 2800m / 131km
Eklebhatti: 2740m / 133km
Jomsom: 272m / 140km
Marpha: 2670m / 146km
Tukuche: 2590m / 152km
Kobang: 2640m / 156km
Larjung: 2550m / 157km
Kokhethanti: 2525m / 160km
Kalopani/Lete: 2535m / 163km
Ghasa: 2010m / 170km
Kopchepani: 1480m / 174km
Rupsechhahara: 1500m / 176km
Dana: 1400m / 179km
Tatopani:1200m / 183km
Ghara: 1700m / 188km
Sikha: 1935m / 194km
Chitre: 2350m / 195km
Poonhill: 3200m / 197km
Ghorepani: 2870m / 200km
Ulleri: 2010m / 202km
Tikhedhunga: 1500m / 204km
Birethanti:1025m / 210 km
Naya Pul: 1070m / 211 km
How To Get A TIMS Card In Kathmandu
Before you hike the Annapurna Circuit, or do any other treks in Nepal, you will need a TIMS (Trekker Information Management Systems) card. Different treks might require more specific permits. You can apply for one at the TIMS counter at the Tourist Service Center in Kathmandu. It’s open from 10 am to 5 pm, 7 days a week. There’s normally a lunch break between 1 and 2 pm.
It costs 2000 NPR ($17 USD) for the TIMS card if you’re hiking alone or 1000 NPR ($8.5 USD) if you’re part of a group. The whole process takes just a few minutes if you have all the required documentations.
What You Need To Bring To Apply For A TIMS Card?
Before you apply for a TIMS card in Kathmandu, you need to know the following:
- Copy of your passport
- 2 passport-sized photos
When you fill out the form, you’ll need to put in the following information.
- Estimated Entry and Exit Date
- Estimated Entry and Exit Point
- Route/Itinerary
- Insurance policy number and coverage
- Emergency contact in Nepal (you can use your tour agency or hostel as the emergency contact)
- Emergency contact at home
For more information on the TIMS card, check out the website of the Nepal Tourism Board.
For more information about which areas require permits and the costs, check out the official Trekking Agencies Association of Nepal (TAAN)’s website.
How Much Does It Cost To Trek The Annapurna Circuit?
In addition to the TIMS card, you’ll also need an ACAP (Annapurna Conservation Area Permit) permit. This cost 3000 NPR ($25 USD) and can be done at the same time. Alternatively, if you go with a tour agency, they can sort it out for you.
For day to day costs, here’s a rough estimate of what you can expect, which was similar to what I spent. Not much has changed the last few years, but 2021 might be a little different as the economy struggles to deal with the pandemic.
- Food & Accommodation: $15/Day
- Guide: $20-25/Day
- Porter: $15/Day
- Transportation From Kathmandu: $5-15
- Transportation From Pokhara to Kathmandu: $7-$20
Also factor in any additional expenses if you plan to take public transportation or transport between Muktinath and Pokhara.
How Much Time Do I Need For The Annapurna Circuit Trek?
This is actually a pretty hard question to answer and prior to doing it, I had heard that it takes about 3 weeks or 20 days to complete the Annapurna Circuit trek. After doing it in less time than that, I’d say that 20 day is the amount of times it takes to leisurely hike the entire loop with time to get back to Kathmandu built in. Most people who do it aim for 14-16 days for just the hike and end up in Pokhara where they spend a few days to rest and recover.
There are others though, who are more limited on time and want to complete the trek in less time. This has led to new shortened itineraries, offered by tour agencies in Kathmandu, to do a trip in as little as 10 days.
To be fair, most of the really lush and mountainous parts of the trek takes place before the Thorung La Pass. The second half of the Annapurna Circuit loop takes you downhill through bigger towns across flatter and more open terrain. Construction has opened up many roads along this stretch, so there are more options to take motor transportation or even to bike the rest of it.

Can You Really Do The Annapurna Circuit In 10 Days?
No matter how fast you ultimately end up hiking, it is extremely difficult to finish the entire Annapurna Circuit loop in 10 days. You, however, can easily complete the circuit up to the Thorung La Pass in 10 days and take a bus to finish out most or all of the other half of the loop starting in Jomsom.
From what I’ve heard, this is what many people with limited time end up doing. It’s really about 8 days of trekking because you spend the first day getting from Kathmandu to Beshisahar and then take a jeep to the village of Chame (29 km into the trek) to begin hiking on day 2. The last day is transportation from Jomsom to Pokhara, where you can fly back to Kathmandu or take another 6-7 hour bus. Here’s what a 10 Day itinerary typically looks like if you go with a tour/guide.
Fast 10 Day Annapurna Circuit Trek Itinerary
Day 1: Bus from Kathmandu to Beshisahar. This takes about 6-7 hours with stops along the way.
Day 2: Drive by 4WD from Beshisahar to Chame. This takes about 5 hours.
Day 3: Hike about 5-6 hours Chame to Pisang. You end up at around 3200m elevation by the 3rd night.
Day 4: Hike 5-6 hours from Pisang to Manang. You slowly gain another 340m.
Day 5: Spend the day in the village of Manang to acclimatize. You have the option of doing a 5-6 hour trek to an ice lake that’s at 4600m to acclimate.
Day 6: Hike 5-6 hours from Manang to Ledar. You spend the night at 4200m elevation. This is the biggest elevation gain so far, hence the extra day in Manang to acclimate and rest.
Day 7: Hike 5-6 hours from Ledar to High Camp at 4833m. There’s a short, but steep hike at High Camp that a lot of people do during the day to be at a higher elevation before sleeping at 4833m.
Day 8: Hike before dawn from Highcamp to the Thorung La Pass. You reach the highest point of elevation on the trek at 5416m. From here you descend down to Muktinath at 3760m. This takes about 8 hours. \
Day 9: Hike about 6 hours from Muktinath to to Jomsom dropping down to 2720m.
Day 10: Take a 9-10 hour bus or a 1 hour flight from Jomsom to Pokhara.
For advanced and acclimated hikers: To get from Besisahar to Birethanti/Naya Pul and complete the full trek, it’s 211 km or 131 miles. That’s comes out to about 13 miles a day over 10 days. While this seems very doable, you would have had to already be acclimated to altitudes near 4500m. For people who are properly acclimated, it is definitely possible to hike the 107 km or 66 miles to High Camp (the stop before the Thorung La Pass) in 5-7 days. You can skip the day of acclimating in Manang and start the hike on Day 1 to one of the few first villages.
On each of the days, you would either hike faster or longer and stop at one of the villages in between the proposed itinerary. The advantage to this is you avoid the main crowd who congregate in those villages. The disadvantage is those in between villages are much smaller and have fewer options for accommodations. By Day 6, you should be able to get to the Pass and start your descent. Days 7-10 gives you 4 days to hike the 90 kms from Muktinath to Birethanti/Naya Pul. There are optinos now to bike part of the way down to the end.
It’s all downhill, but it’s also very exposed to the elements during this stretch.
12 Day Annapurna Circuit Trek Route
With an additional 2 days, you have the option of starting the hike from the beginning instead of taking a jeep 29 km straight to Chame and hiking to Kalopani. Alternatively, you can start in Chame and use the extra two days to get to Tatopani, taking you 3/4 of the way around the circuit. If you are somewhat acclimated, you can also skip the day in Manang and push to complete the last 28 km to Birethanti/Naya Pul from Tatopani.
14 Day Annapurna Circuit Trek Route
This is probably the most common number of days for people who want to complete the entire Annapurna Circuit loop from start to finish in a well paced but still expedited manner. It’s similar to what I just mentioned for the 12 day trek, but you can complete the first section without the jeep, still have your acclimatization day in Manang, and make a push for the downhill and flat sections to get to Birethanti/Naya Pul.
Teahouse Food and Accommodation On The Annapurna Circuit
Teahouses are a cornerstone part of the Annapurna Circuit experience. It’s where you rest for lunch and it’s where you spend the night and take dinner. The offerings are pretty barebones, but any and all comfort will be welcomed after a long hard day of walking. The higher up you go, the more you appreciated reaching one of these villages for the day.
As far as food goes, trekkers often take breakfast and dinner at the teahouse where they stay and lunch at a different village on the trail. Sometimes, you can only get a room if you eat at that teahouse and these rooms generally run around 300 Rupee (3 USD) for a double.
You might even get away with asking for free accommodation if you are hiking without a guide or porter and agree to eat there. But I don’t recommend this. A large part of Nepal’s economy is built around tourism and income from trekkers. You might be saving a few dollars that’s worth a lot more for these families. Many of who are desperate for business, especially with everything happening since 2020.

Eating At The Teahouses On The Annapurna Circuit Trek
Food and tea service is how locals earn their income and benefit from the tourism. It’s a simple rule of thumb that the price of food, tea and water will rise with the altitude. Without roads in and out of these remote villages, they have to transport that cold beer or Snickers bar you are enjoying by foot or donkey. You’ll be passed by porters in sandals carrying large loads on their back doing the same trek as you. The higher you go, the longer it took them, so keep that in mind as you wonder why prices are higher.
Are There Vegetarian Restaurants On The Annapurna Circuit?
You’ll find similar menus across all the teahouses with the Dal Bhat sets being the most cost-effective option. Most meal offerings at these Annapurna Circuit teahouses will be vegetarian. A set will come with rice, lentil soup, and vegetables. If you are hungry, they will serve you seconds. Beyond this and the delicious Tibetan bread, there are your western entrees like pasta and pancakes if you need a break from lentils.
Finding a meat option is pretty rare except at some of the larger villages where you can find more exotic dishes like yak steak and yak stew.
Water is an essential requirement and will be priced accordingly. Consider bringing a couple of water bottles and treat your water with iodine tablets if you don’t want to add to the one time use plastic problem. It’s also a good idea to stock up on snacks before starting on your trek. You’ll appreciate any forms of carbs to keep your blood sugar level up during the hike.

Wifi and Cellular Data Coverage On The Annapurna Circuit
Most teahouses and lodges now have internet and WIFI connection, but expect to pay a few hundred rupees for access. Depending on the weather, the strength of the connection may not be what you’re used to, so do not always rely and expect a strong steady connection.
Nepal Local SIM Price and Procedure
It’s best to buy a local SIM ahead of times if you need data on the trail, but once again, due to the remote area and terrain, data will not always be available on the trek. I recommend just picking up a free Nepal Telecom SIM at the airport or in Kathmandu (you pay for a small fee) before you start. You can charge up for the number of days you require during your visit. There are a number of packages starting ranging from 1 day to 28 days with prices starting from 55 NPR ($.40) to 800 NPR ($6). The upper end will get you 25 GB of data for 28 days. Though you can get the SIM for free at the airport, the packages will cost more, so it’s better to just get it at the official Nepal Telecom store in Kathmandu.
Ncell Nepal also offers cheaper SIM packages if you just need data.
If data is really important to you, I recommend getting a SIM from each provider to maximize your chances of getting coverage. It’s quite economical to do and it will give you some peace of mind, especially if you’re hiking solo.
Getting a SIM in Nepal will require you to register with your passport along with a passport sized photo.
Charging Your Phone And Devices On The Annapurna Circuit
While the tea houses have outlets to charge, it is not enough for everyone and the guides and locals will need to charge their devices first. I keep my camera battery chargers in an easy to access location so I can do quick charging sessions at lunch or as soon as I get to a teahouse.
Though it adds a bit of weight, it is highly recommended to carry a large reliable power bank with around 20000 mAh worth of juice that holds its charge in cold weather so you can charge your devices several times over without worrying about doing it every day.
Best Time To Hike The Annapurna Circuit
A bit of knowledge can go a long way when it comes to choosing the best time to visit Nepal and hiking the Annapurna Circuit. While getting to the start of the Circuit doesn’t require a stomach-churning and weather-dependent flight like it does to get to start the Everest Base Camp trek, heavy snow can close off the Thorong La Pass cutting off your access to the other half of the circuit.
The Annapurna Circuit follows Nepal’s general hiking seasons. The dry season starts in October/November, making it one of the best time of year to do the Annapurna Circuit trek amidst landscapes that are lush and green from the recent monsoons. Visibility is clear and you can get amazing views of the Himalayas throughout the hike.
December and January offers similar visibility but a drop in temperature that can make the Annapurna Circuit trek very cold or even closed at the pass. February to April reopens the window for a more comfortable trek before the monsoon and heat hits in May. It’s best to avoid the Annapurna Circuit trek from June through early September where the humidity and monsoon arrives in full force. The trails are wet and muddy and waterfalls and floods can partially block the trails and roads to and on the Annapurna Circuit.

Should You Get An Annapurna Circuit Guide Or Porter?
If you’ve met someone who’s trekked the Annapurna Circuit on their own, they’ll probably tell you that you don’t need a guide. If you walk into one of the tour offices in Thamel, they’ll probably tell you that not only should you do it with a hike, you should probably hire a porter to carry your pack as well. So which is it? Instead of giving you a convoluted one-size-fits-all answer, check out this little FAQ below.
Can You Find Your Own Way?
The circuit doesn’t require you carry a personal GPS system to find your way through unmarked trails. It’s pretty easy to follow. There are several times where the road splits, but you will generally be able to figure it out. You can get by communicating with basic English, simple gestures or just pointing to things. Maps and information are available so you can figure out where it’s recommended you stop each day and how long you should take to acclimate to each of the stages leading up to the pass.
You will meet other travelers along the way as well as plenty of guides accompanying different hikers and groups. In other words, if you start alone and feel like joining up with people, you just have to ask or make friends. For the Thorong-La Pass, there will be many people at the base camp doing the same thing. You can just join in and do what others are doing if you feel unsure of hiking in the dark up a snowy mountain pass.
How Much Does A Guide Cost?”
Guides generally run between 15-25 USD per day. If you are splitting the cost, it’s more cost effective. If you’ve factored in the cost of getting to Nepal and taking the time to do this once in a lifetime trek, the added cost of having a guide is pretty reasonable. You also support the local economy and provide a job to one of the locals, which is the least you can do in return for what you’re getting on the hike. The cost of their accommodation and food is included. As far as I know, there is an agreement that guides are provided food and accommodation when they are accompanied by hikers. It’s almost like a commission thing if you want to think about it like that.
Side note: We still invited our guide to join us for little coffee stops and we shared some of the treats we bought along the way with him. Remember that every dollar they make counts and goes towards supporting their family. It’s an extreme luxury for them to buy chocolate bars to snack for fun.
Do You Like To Make Your Own Schedule?
While the guide will accommodate for your needs, they will generally stick to the schedule that you and the tour office decided on beforehand. If you came in and said I have 14 days, they will come up with an itinerary to make that work. If you said, you had 10, they will still find a way to make that work. But this is almost an arbitrary number since you really don’t know how you’ll feel after 5 days of hiking for 4-8 hours uphill. Doing it on your own means you can potentially stay an extra couple of nights in a village if you want to just relax and enjoy the mountain air or have another yak steak. We loved that we had extra time when we came across an annual archer’s festival in the town of Manang.

It’s not that you can’t do this with a guide, it’s just easier when you only have to be considerate of your own schedule.
Will The Guide Carry My Stuff?
A guide generally will not. That’s the job of a porter who you can hire to carry your backpack. This may seems luxurious, but it may enable weaker hikers to do the trek without having to carry their 15-20 lb pack. For photographers, it may free you up to carry just your camera in a smaller pack. At the teahouses, the guide can add a measure of comfort by getting you extra blankets for the cold nights or pre-ordering your breakfast so it’s ready when you wake up, amongst other things. It’s almost like having a friend-cum-butler.
You can also get a guide cum porter, a 2 in 1 solution, although I suspect it just means the tourist office is providing you with a regular guide and making him carry your pack. Don’t do this, or at least plan to tip him extra after the trip.
What Happens If I Get Hurt On The Annapurna Circuit?
There’s always an inherent risk in hiking alone. I always prefer to hike at least in pairs in case you get hurt and require some assistance. Cuts and bruises are easy enough to deal with but can you identify the symptoms of high altitude cerebral edema (HACE) or high altitude pulmonary edema (HAPE) and make the right decisions to descend or call for a helicopter evacuation? Unfortunately, altitude sickness is more common than people think and having someone experienced by your side can be useful or even life-saving.
What I Did For My Trek
Usually, I think there is something more fulfilling about tackling a challenge on your own (or with a friend). The independence of it is an intangible but significant consideration. If you prefer to have a more comfortable experience, hiring or sharing a guide won’t break the bank, but will put your mind at ease as far as not getting lost and not having to do the research to plan your own itinerary. One last thing to consider is that you will be spending the better part of 10-21 days with this person. You may enjoy the conversation and company or you may attempt a night time escape.
I met another traveler before the trek, and we decided to share a porter for many of the reasons I listed above. Back in Kathmandu, the hostel held on to a few things we didn’t need to bring on the trip. I lightened my load enough so that I could carry my camera gear in a one backpack and used the spare space for a few more items. The rest of it went into a part of the porter’s pack. My friend did the same. We all ended up hiking with a lighter pack, including the porter, who usually expects to carry a fully loaded backpack for his guest, along with his own stuff.
What To Pack For The Annapurna Circuit
A backpack is a good start. A comfortable backpack would be a better start. Then there’s the trekking shoes, the trekking sticks, the trekking socks, the trekking beanie, a trekking shirt, a warmer trekking shirt, and you get my point. You’re going on a trek. You’ll need some trekking gear. You can also do the whole thing with just a pair of shorts, a tank top, and a toothbrush but it might be a little uncomfortable at times.
Somewhere in between is probably the way to go, but that’s still a lot of gear to think about and bring with you to Nepal, especially if you are on a longer trip that isn’t centered around trekking. Thamel and Pokhara is a one stop shopping town where you can buy everything you need on the cheap (if you don’t mind buying some North Fake instead of North Face). I recommend you get your stuff before coming to Nepal. Here’s a list of essential things you should bring for the hike.
Essential Trekking Gear List
Passport Sized Photos. This is not a piece of gear, but I also travel with a few passport sized photos of myself. In Nepal, you will need to for things like buying a SIM card and getting your TIMS card that permits you to hike the Annapurna Circuit.
Trekking Shoes. Something comfortable, preferably broken in, with good grip and ankle support. The terrain will range from dirt roads to rocky snow-covered trails.
Socks. Moisture wicking socks will keep your feet dry and happy. These are hands down my absolute favorite. I’ve never gotten any blisters or feet damage in them. Bring as many pairs as you feel you need, but you can also air out a pair while you wear another.
Base Layer. This is arguably one of the most important layers that’s often overlooked. You want a good moisture wicking base layer that’s snug but comfortable. Even though it’s cold, you’ll still sweat while hiking and you’ll want to keep the moisture away from your body. Get a layer that doesn’t leave empty spaces against your skin where your salty sweat can deposit and dry, thereby causing uncomfortable chafing. At the same time, it shouldn’t be so tight or unnecessarily compressing that your movement is restricted. I prefer a base layer that doesn’t go too high up the neck, opting to protect that area with my outer layers or a buff/balaclava so its more comfortable.
Fleece or Merino Wool Top. This is your middle layer and provides the insulation to keep the warmth generated from your body from leaving. I prefer my favorite compact fleece, but a merino wool sweater is a also good alternative that provides comfort and warmth while staying lighter than the fleece.
Down Jacket. This is my favorite layer because a good down jacket will keep me cool and warm in most weather. On slightly warmer days, I can even use this over the base layer and skip the middle layer. When it’s not raining, my favorite down jacket protects well against the wind and insulates even better than my merino wool pull-over. This one is something you replace once a decade, so something worth investing in and making the right choice up front. I personally always have two different down jackets for aesthetic and practical reasons.
My favorite is this Mountain Hardwear 800 fill goose down jacket. It is my go to all weather jacket because I can wear it in the snow and still stay cool enough in the spring and fall. It’s unbelievably light and packs into itself so it will go with me everywhere.
I also own this North Face synthetic hooded down jacket. Synthetic down has come a long way and offers much better insulation retention when it gets wet. It’s not as light, so a comparable jacket (in warmth) will be thicker and heavier than goose down. The problem with the goose down is that you can’t get it wet. As soon as it gets wet, you lose almost all the insulation very fast and it is almost useless.
Waterproof Shell with Hood. This is another item that I consider a necessary investment. After using my last one for nearly 10 years, I switched to this Marmot shell that’s breathable and keeps the water out for extended periods of rain. This was also one of the few jackets that WAS NOT boxy and overflowing, making it something I can wear in the city as well as the great outdoors.
Travel Underwear. I’ve only worn one type of underwear for the last 10 years and don’t plan on changing. The Ex-Officio ‘travel’ underwear is the best underwear for traveling. It’s super comfortable, fits very well, has anti-microbial properties, and dries on its own in like an hour after a washing. They are very durable, each pair, though more expensive than your standard Fruit of the Loom, lasts much longer. I wear the boxer briefs version, which I recommend for active guys. The streamline women’s version is here.
Thermals or Leggings. We’ve moved downtown now. Like a base layer top, you’ll want a base layer bottom. A good pair of thermals should not get sagging throughout the day or make you feel like you’re wearing two pairs of pants. Leggings are a good options for both men and women and can be worn like a second skin over the thermals to keep you lightweight but warm.

Stretchy Pants. Hiking pants or jeans, it doesn’t really matter. Just make sure it’s stretchy so you can move with the multiple layers on. I actually have a couple of nice pairs of denim from Japan that have a little stretch to them and I wear these everywhere, even rock climbing. They are form fitting and stylish, but flexible enough that I can hike in them comfortable.
Waterproof Pants. If you going during the rainy season, which I don’t recommend, remember to get waterproof pants or else the waterproof jacket is kind of pointless. A lot of people make this mistake for some reason, packing only the latter. You don’t need to get fancy here, but find a pair that is not too baggy.
Backpack. Get one with a hip belt. It’ll save your shoulders across all those miles. Best overall pack with a reasonable price tag I’ve found is the Kelty Redwing 50. It’s incredibly good value and very comfortable. It’s not too big at 50L, so you can pack it light or pack it up. I suggest you pack light though.
Beanie/Gloves. While it’s a myth that you lose most of your heat from your head, it’s still nice to keep that noggin of yours warm. The same goes for those fingers.

Flip Flops/Thongs. Give your feet a break at the end of the day.
Sunglasses. Protect your eyes. Remember that the snow will reflect the sunlight, which can be quite blinding during the hike to the pass.
Headlamp. Bring a headlamp and bring extra batteries. This will probably save you from spraining your ankles walking around those uneven pavement and trails at night. Or keep you from stepping into the squat toilet before, or even worse, after you take care of your business. Invest in a good waterproof headlamp with high lumens. It will always come in handy for other trips and your travels.
Snacks. There are little shops in villages selling you those Oreos and chips, but this can add up as you get closer and closer to the pass. Save that money to pay for that warm cup of tea or the Tibetan bread. Go for calorie-packed snacks with a small footprint to save space in your bag.
Other Things To Pack
Passport. You’ll obviously have this, but don’t forget to bring it on the trek. You’ll need this to check in at the security check points.
Cash. There aren’t many ATMs along the way. Pretty much all the way until you get to Jomsom. I suggest at least 1500-2000 NPR a day to cover all your accommodations and food and a bit more for those just in case moments. As in, just in case you want extra celebratory beers or you rip your pants and need to buy a new pair along the way.
Camera. Capture those special moments. I like to travel with light gear on long treks like this, so the Fuji X100V is an amazing camera for that. It’s great for capturing moments along the way and the 35mm focal length is wide enough for people and landscape shots.
The RX-100 VII is their best all-in-one compact camera to bring as far as minimal gear. It fits in your pocket, takes incredibly high resolution photos, 4K videos and has a 24-200mm range. This means you can take wide photos, portraits, and telephotos like the one below, all in one tiny package.
If you’re a professional photographer with proper gear, I suggest you take one wide zoom, like a 16-35mm and a long telephoto that reaches 200-300mm close up of the mountains. If you want to know what I shoot with, check out what’s currently in my camera bag.

Extra Batteries/Charger. You’ll be on this circuit for quite a few days, so don’t forget the chargers. You won’t need your phone for calls, but it doesn’t hurt to keep it charged and don’t expect to be able to charge it at every teahouse. Bring a high capacity power bank like this one with 25800 mAh.
International Adapter. Unfortunately Nepal doesn’t have a standard socket. You’ll find the two pronged and three pronged sockets seen in Europe and India, but also find North American sockets. Be prepared.
Compass. Not exactly required, but nice to make sure you are heading in the direction you think you’re heading in.
Water Bottles/Iodine Pills/Electrolyte Tablets. You can buy water along the way. This can add up. A bottle of water can get up to around 200 rupees near the pass. If you fill up along the way, treat your water with iodine pills. There are stations with safe drinking water as well, but it’s not available at everywhere. Electrolyte tablets will help to restore some of that salt you are sweating away. It’ll also come in handy if you get some funky bowel movements and lose a lot of liquid out of that other end.
Sunscreen. DO NOT FORGET the sunscreen. My face cracked even with sunscreen on because the sun is much stronger the higher you go in altitude. Apply liberally and reapply often.
Trekking Poles. Extra stability and support. Might save you from a stumble or two. My favorite are these super compact ones that take up no space at all in my travel bag. It’s held up well for something so small and I’ve only replaced it once in 10 years.
Alarm. A phone or watch will work. You don’t want to accidentally oversleep and miss half a day’s hike. This is especially important the of the pass crossing when you’ll want to leave early enough to get across in time.
Book. You’ll probably want to take a nap or sleep after a hard day’s hike, but a book is a great way to pass the time when you’re not sharing stories with other trekkers at dinner. I always carry my paperwhite.
Music. I loved the beautiful silence of hiking along the Annapurna Circuit, but sometimes it was nice to have a motivating song to get you through the tougher uphill climbs.
Moleskines. Not the journal. I’m talking about the little adhesive strips that will cover your blisters and keep it from being rubbed on.
Toiletries. Bring your toothbrush, toothpaste, deodorant and anything else you might need like contact lens solutions. I’m not going to tell my female readers what to bring. You know better.
Travel Insurance And Vaccinations For Nepal
Although this comes at the end of the article, it is still very important to note that I highly recommend getting travel insurance for Nepal. As beautiful as the country is, it’s still a developing country. You should always keep up to date with your routine vaccinations. Many of these might require multiple vaccination follow-ups so plan ahead of time.
There’s no vaccination requirements for Nepal, but you should keep up to date with these:
- Hepatitis A
- Hepatitis B
- Thyphoid
- Chloera
- Yellow Fever
- Japanese Encephalitis
- Rabies
- Polio
- Measles (Routine)
- TDAP (Routine)
- Chickenpox (Routine)
- Shingles (Routine)
- Penumonia (Routine)
- Influenza (Routine)
- Meningitis (Routine)
As far as travel insurance goes, one thing I want to point out is that there are some travel credit cards that offer mild medical insurance coverage, it is often not comprehensive. Sure, if you lose your luggage, get stranded because your flight’s been canceled, or need to travel for home family medical emergencies, you may be covered. However, it is very rare, if not impossible, to find a travel credit card that offers medical coverage in any capacity. I personally recommend not relying on it for your medical needs.
For Nepal, I strongly advise you get proper travel insurance, especially for any hikes at altitude. High Altitude sickness affects everyone differently and can even hit you hard if you’re a healthy and fit person. In rural and hard to reach areas, you might need medical evacuations if something goes wrong. I always get travel insurance mainly for medical evacuations, because this can cost a lot of money and may not be covered by your insurance plan.
The go to travel insurance that most backpackers and traveler, including myself, swear by World Nomads. They are priced reasonably and while I haven’t had to make a claim with them, others haven’t had problems.
Last Bit Of Advice For Hiking The Annapurna Circuit
This is a once in a lifetime hike. I’m not exaggerating because most things change and the Circuit is no exception. With the construction of roads to provide better access between the villages, some of the old trails are disappearing or have disappeared. A hike that used to demand 3 weeks can now be done in a much shorter timeframe with a combination of buses, jeeps and plane rides.
While this will enable more people to enjoy the Annapurna, it also means that those who’ve hiked it 10, 20 or 50 years ago will not get to do the same hike again. The is true even for those doing the hike this year.
Take your time and enjoy it. But also take your time because it’s safer that way. Don’t ascend too fast. Listen to your body. If you are getting the symptoms of altitude sickness, descend immediately and take it from there. Turn back if you need to. It happens and while it’s disappointing, it’s better than leaving in a body bag. Stay hydrated and try to sleep at a lower altitude than you hike to during the day. This will give your body more time to acclimate. And of course, try the Tibetan bread.

Updated on April 10, 2024


[…] This is Part II of my Ultimate Guide To Hiking The Annapurna Circuit. Read Part I. […]
Very useful information, thanks a lot!
ps: Great photos!
Thanks!