Review: Is This The Best Japanese Knife-Sharpening Workshop In Kyoto?
Review: Is This The Best Japanese Knife-Sharpening Workshop In Kyoto?
As someone who cooks a whole lot, I’m embarrassed at how infrequently I sharpen my knives. It’s mostly an afterthought, and I’m sure my technique could be improved.
With another trip to Japan planned and a stop in Kyoto to do a special indigo dyeing workshop with artist Toru Shimomura, I had the chance to pick up a new knife (or two) and learn how to sharpen them – properly.
Sometimes it’s necessary to unlearn something to learn it again properly.
Kyoto Knife Sharpening Workshop
Right in the heart of Kyoto, just minutes from the famous Nishiki market, I found a knife sharpening workshop – for ¥25,000. At around $170, it seemed high until I saw that the workshop includes a knife from their shop that you take home afterwards.
Considering a good knife runs between ¥20,000 – ¥30,000 yen for a good knife in Kyoto, with many easily going into the ¥40,000 – ¥50,000 range, I was intrigued.

So I took a chance and booked the workshop. Here’s how it all went down.
A Knife Store and A Workshop
The shop, Hamonoya Hirai (see location), is unlike most of the other knives store in Nishiki. As you walk in, the right wall is a display of ready to buy knives in different shapes and handle combinations. The shop is ‘cluttered’ in an organized way where tools, parts, and products share the same space, with nothing behind glass counters or windows.
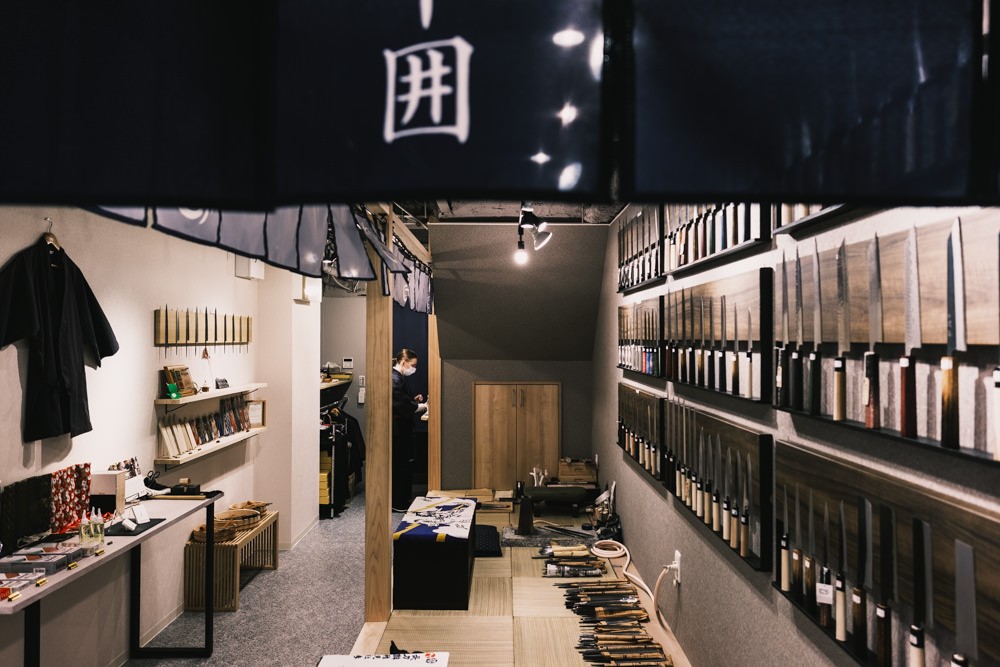
And then you notice the stacks of blades, loads of them, individually wrapped in old newspapers, sitting unassumingly in the open. In the corner are boxes filled with tools and more unfinished knives in wooden baskets. I couldn’t quite put my finger on it, but there was something about the shop that I liked more than the polished storefronts.
It’s part showroom, warehouse, and workshop all in one.


Meeting ‘Tatsu’
I’m greeted warmly in Japanese and English by Tatsunari Hirai, the owner of the shop, who goes by Tatsu. He politely apologizes for his English, which is completely unnecessary because I understand him perfectly. Some of the workshops I’ve done in Japan required a translator, but I’m able to communicate perfectly with Tatsu-san in English.
Tatsu-san is younger looking than I thought he’d be as the owner of the shop, but has been around knives for many years.
After apprenticing with a knife maker in Sakai, famed for their long history of knife forging, Tatsu-san opened his own knife store with a focus on sharing the tradition and craftsmanship behind Japanese knives with a broader audience abroad through his workshops.
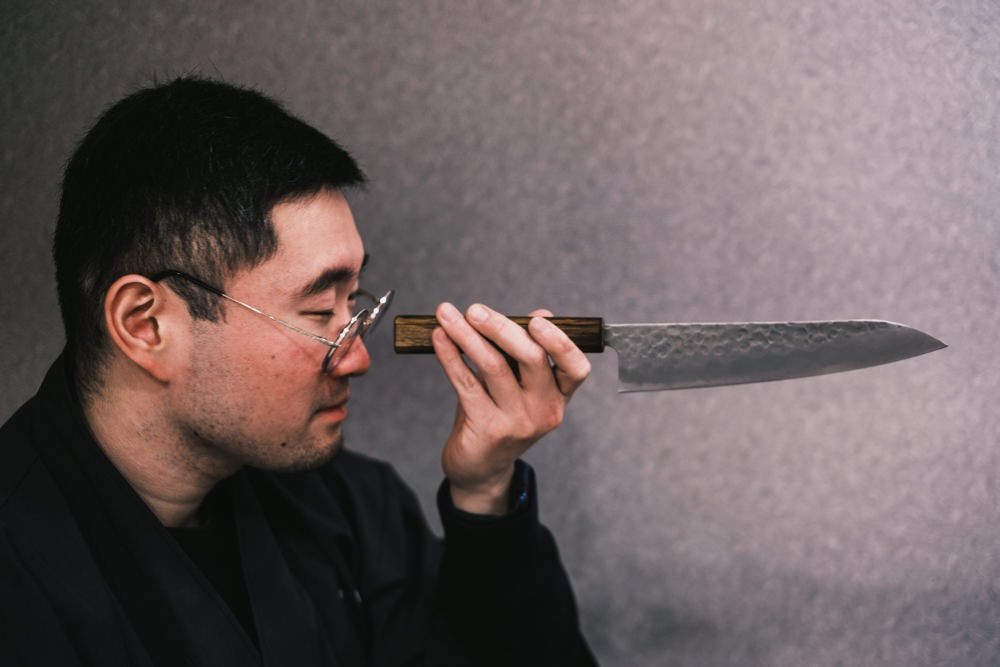
Choosing Your Knife Type
After a short introduction, Tatsu-san lays out five blades that I can choose from, with an explanation for their each. Normally, the workshop allows you to choose from a Santoku, Deba, or Yanagiba knife, but depending on the availability, there might be more options, including more expensive blades that you can swap to for an additional fee.
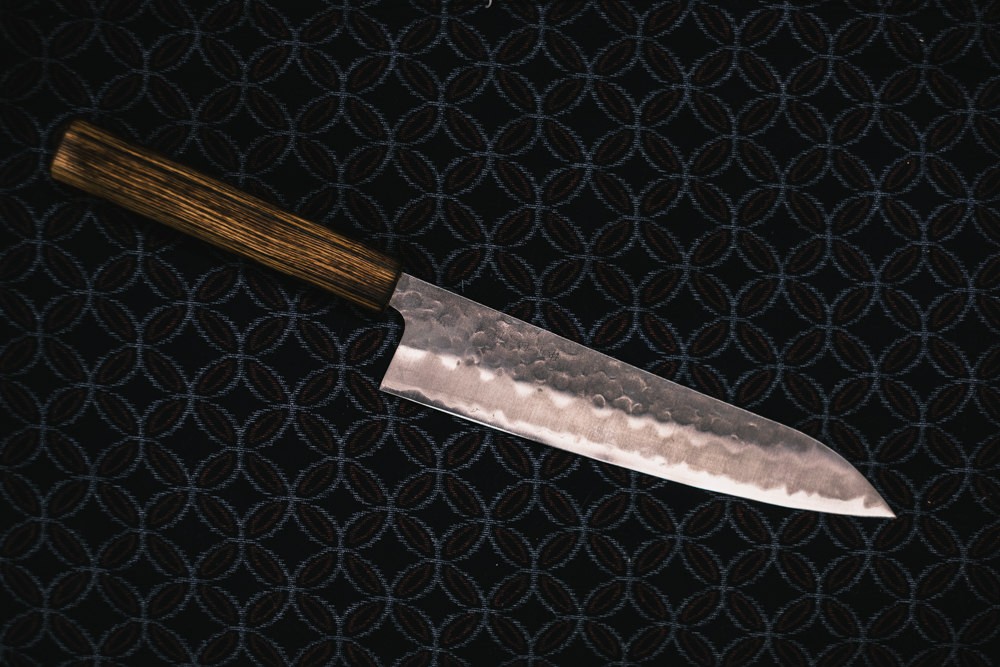
I initially chose the Yanagiba, which is used to delicately slice fish, but I couldn’t resist the beautifully hammered finish on the Gyuto and upgraded to that instead.

All the knives are from the famous knife-making city of Sakai, in nearby Osaka, which produces some of the finest cutlery in all of Japan. Their high quality sought after blades overwhelmingly preferred by professional Japanese chefs.
My particular knife was forged with cladded steel, meaning the cutting edge is made from ultra-sharp carbon steel that’s easier to sharpen, but it’s sandwiched between an outer layer of rust-resistant stainless steel for easier maintenance.
If you are new to the world of Japanese knives, read my 6 Things To Know Before Buying A Japanese Knife Guide that breaks down the different types of blade designs, steel type, and finishes. It’s a good page to bookmark if you’re looking to buy a Japanese knife or need help figuring out what kind of knife you should get.
The ‘Paper Test’
A shop assistant offers me a samue work jacket to wear for the workshop while my knife is fixed with a temporary handle by Tatsu-san. Together, we all head upstairs to a dedicated workshop space where individual stations have been prepared with a dull knife, and two whetstones of different grit that will be used for the sharpening.
Tatsu-san starts with an explanation about the characteristics of Japanese knives, including importantly that most have a 30° edge, which means each side has a 15° angle compared to a 20° angle on Western knives. This is the angle we will aim to sharpen the edge.
The workshop is broken down into three parts: demonstration and lesson, sharpening practice, and affixing the handle.
During the practice phase, we work with a both a cheap dull knife, to show the effectiveness of sharpening on even low quality steel, and with the knife we chose.
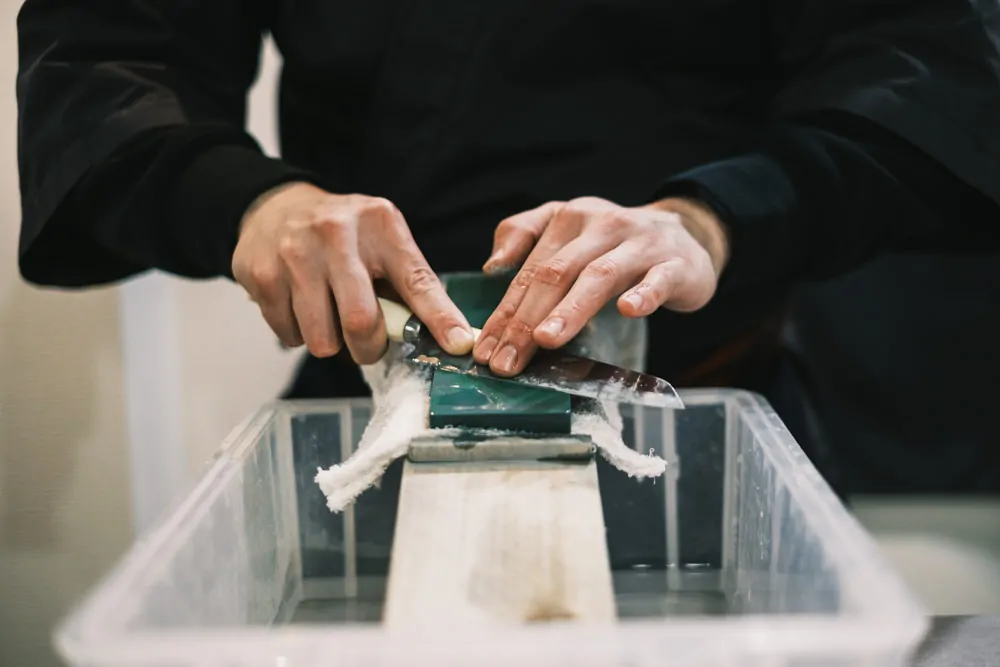
The ‘paper test’ is a simple way to see how sharp or a dull a knife is. Without using much effort or force, you gently pinch the knife and run it from the top edge downwards. A sharp knife will slide through with great satisfaction, while a dull knife will rip, tear or pull on the paper.
Unsurprisingly, the dull knife does what it’s meant to do and hardly gets through a small section before pushing and tearing at it.


Meditation And Art Of Sharpening
From here, I follow Tatsu-san’s instructions and begin grinding the blade up and down against the whetstone, praying that I maintain a 15° angle, while he supervises. Occasionally, he will adjust the angle of my edge as well as the blade, but is mostly encouraging.
We apply pressure with two fingers and work a small section of the blade at a time with steady and even strokes up and down. The tip requires a slightly higher angle and fewer strokes.
When we reach the end, Tatsu-san brushes the edge of the blade against my lower palm to feel for the burr, excess metal off the edge. I think I feel some resistance, but I’m not sure.
We flip the blade over, add a bit of water to the whetstone and repeat the process on the other edge. I’m still careful with each stroke, and the mindfulness feels very meditative. For a short while, I’m lost in the process, trying to feel and imagine the steel being shaved away on a microscopic level.
In total, I went through each side several times on the coarser 220 grit whetstone and a couple times on a medium 1000 grit whetstone. The process was so relaxing, I hardly realized how much time had passed. At the end, we edge out the burr, wiped down the knife and prepared for another run at the paper test.
This time, the cheap knife went through like butter.


Sharpening My Own Sakai Knife
As I mentioned before, Sakai knives are renown for their sharpness and craftsmanship. These hand forged knives are made using a division of labor that separates the blade forging, sharpening, design, and handle attachment. Each process is attended to by a master craftsman who focuses on just one aspect of the knife making, ultimately resulting in an unmatched tool that’s used by over 90% of professional chefs in Japan.
Most blades are sharpened to a cutting edge, but they left to be finished in a shop after a customer makes the purchase, to ensure the knives are perfectly sharpened before delivery.
In my case, I was responsible for this final edging.
Having practiced on the cheaper knife, I felt a tiny bit more confident repeating the process on my Gyuto knife. To my surprise, I had a much better “feel” this time around, sliding the blade along the wood to feel out areas that need more work. Keeping my angle consistent was a bit easier as well.
I only required two passes on the finer grit whetstone before I got the nod of approval from Tatsu. It was time to complete my knife with a handle.
Most importantly, I was genuinely excited to have “fixed” my sharpening skills while developing an appreciation for the slow, meditative process.


If you are traveling to other places in japan, check out my COMPLETE JAPAN GUIDE FOR KNIVEs AND SWORD LOVERS.
Adding The Handle
Traditionally, most Japanese knives have natural wood handles, with the lighter magnolia wood, honoki, from a type of Japanese Cypress tree being the preferred material for its strength, workability, and water-resistant properties.
It’s typically fitted with a ferrule on the end that meets the blade to seal and fasten the tang of the blade to the handle.
I personally love walnut as a wood, and I could not resist paying a bit more to have the dark walnut handle to complete a knife that I know I’ll cherish for years to come.


After the tang of the blade is heated up and softened, Tatsu-san fits it into the handle. He hands me the knife and a wooden hammer so I can pound the end and ‘push’ the blade snugly into handle. I’m a bit nervous blade will come flying out, but it works out and I hand the knife back to Tatsu-san for him to apply the wood glue and seal in the excess space.
In total, I paid ¥25,000 yen for the workshop through Rakuten and knife plus an additional ¥5,000 for the different blade and ¥3,000 for the walnut handle. This was still less than similar knives I had been looking at in some of the other shops, so I left very happy with both the experience and my new Japanese knife.
Updated on January 5, 2026