TourBox Elite Plus Breakdown Review: Buy, Upgrade or Pass?
TourBox Elite Plus Breakdown Review: Buy, Upgrade or Pass?
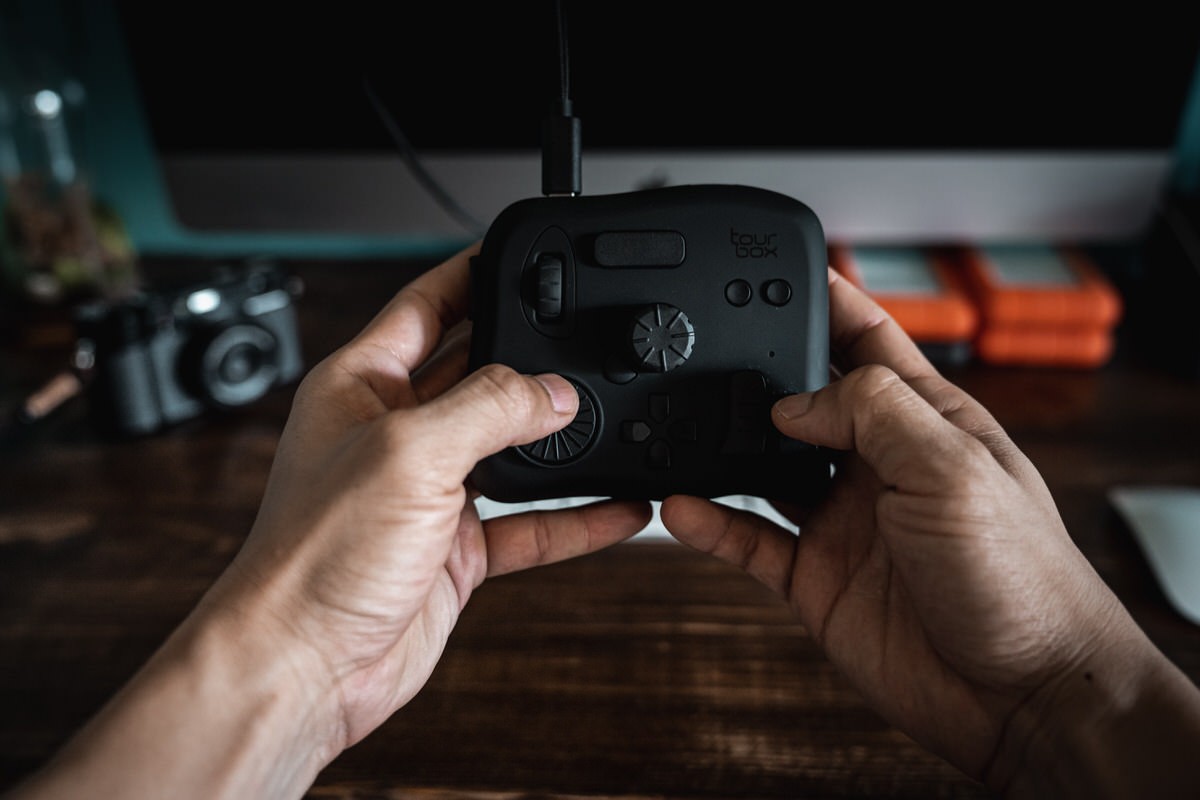
I’ve owned just about every TourBox from beginning, have worked with the company to offer my feedback for future features, and have even shared my personal presets that can be downloaded on the official website. The wireless TourBox Elite was one of those rare devices that earned a permanent space on my desk for the last few years, only now being replaced by new TourBox Elite Plus.
Instead of reviewing the TourBox Elite Plus when it came out back in August 2025, I wanted to wait for some of the new features to be developed and released and offer a long-term in-depth review of how I’m using the new device in my daily workflow in 2026.
Since I’ve also written extensively on the practically the entire line-up, I’ll cover things from a high level for both new and existing users and link to my existing posts where the information is still relevant. You can also download my newest Adobe Lightroom Classic preset here for free, if you want to have a starting point for customizing your own preset.
Also, remember to save promo code Kien10 to get an additional $10 off any Tourbox device.
What’s New with the TourBox Elite Plus and Console 5.12?
1. Tablet Compatibility
The TourBox Elite Plus is the first TourBox that works with iOS and Android tablets. For digital artists who work on iPads and tablets instead of a desktop or laptop, this is the version for you. The Elite Plus goes for $297, effectively replacing the Elite at $268. You can also find them here on Amazon, but I generally find the prices lower on the TourBox website.
While, I don’t do as much on my iPad Pro, I’ve been asking for years when they’ll make the TourBox work with tablets. For graphic artists who use programs like Photoshop, Procreate or CLIP STUDIO, the ability to quickly bring up tools, change brush type and size, and swap between layers is a game-changer.
The Tourbox Elite Plus is a natural companion for artist who want to work on tablets.
If anything, the TourBox is an even better pairing for tablets than it is for computers, where you lack a physical keyboard.
Having physical buttons, dials, wheels, and switches mapped to shortcuts and tools is indispensable when you’re using a stylus that has, at best, a tap or double tap functionality on its own.
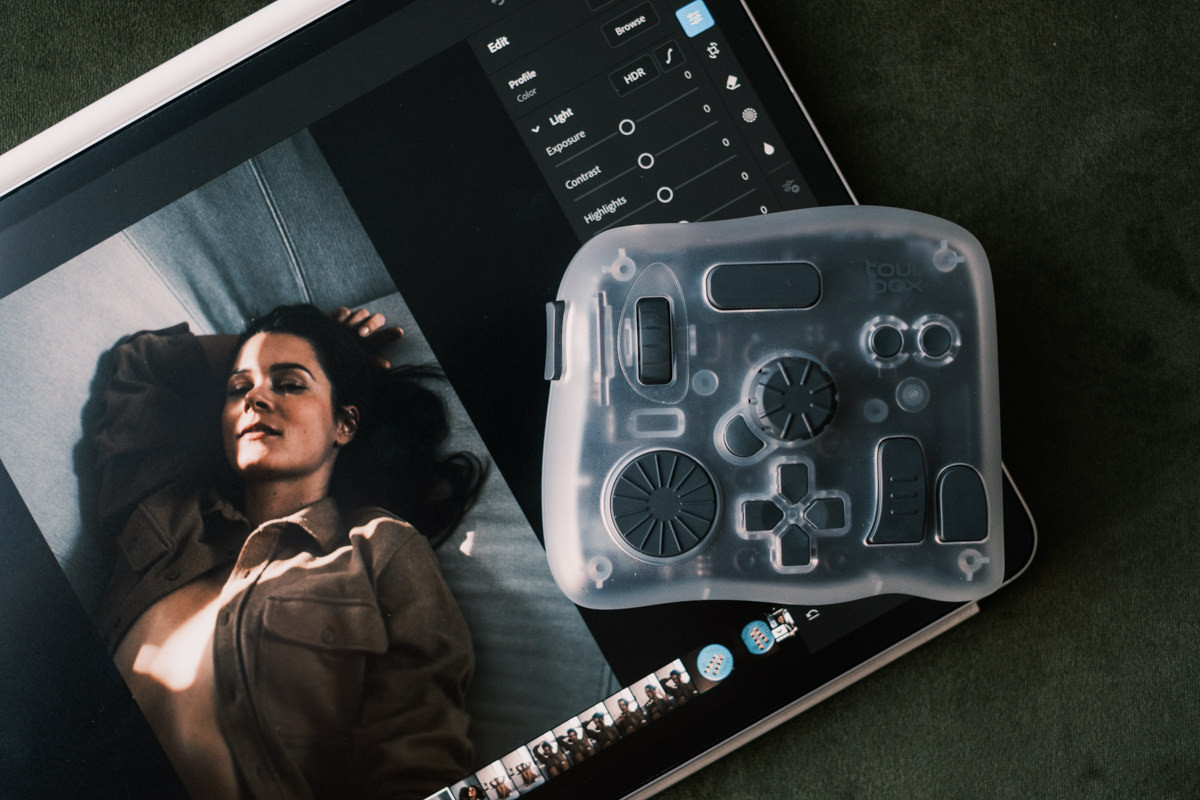
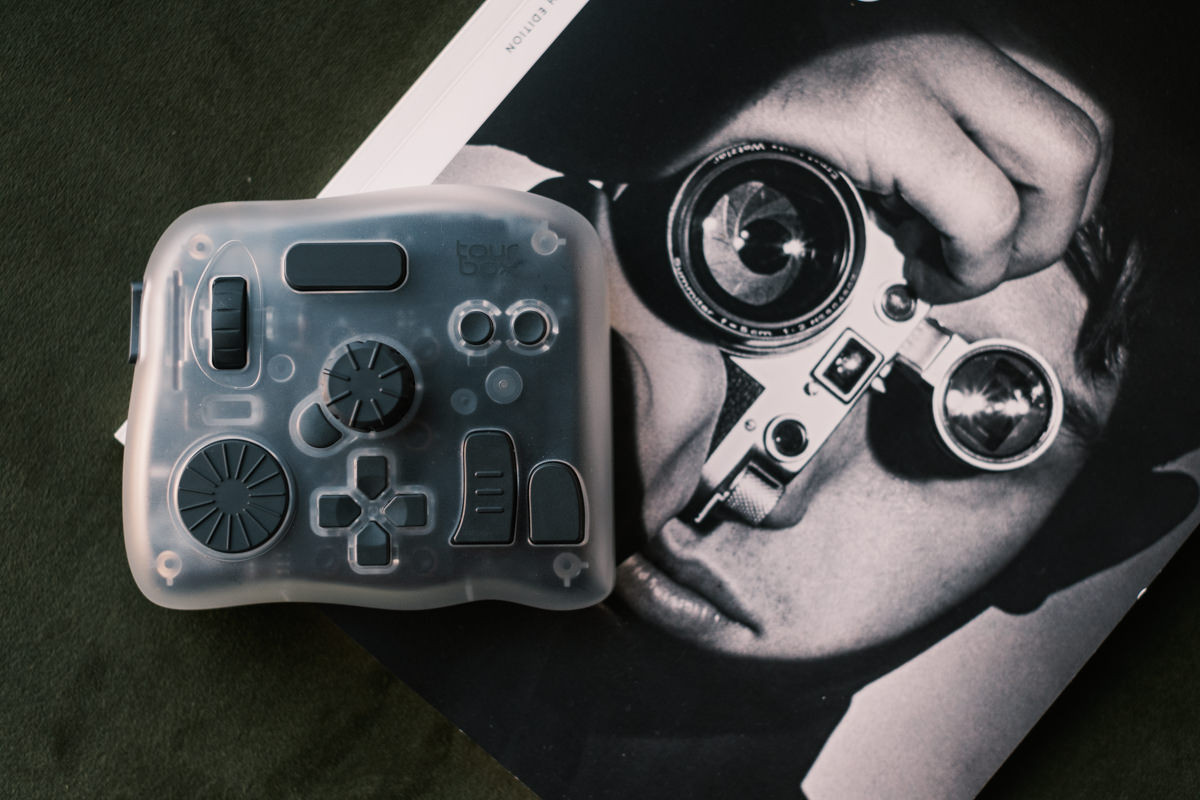
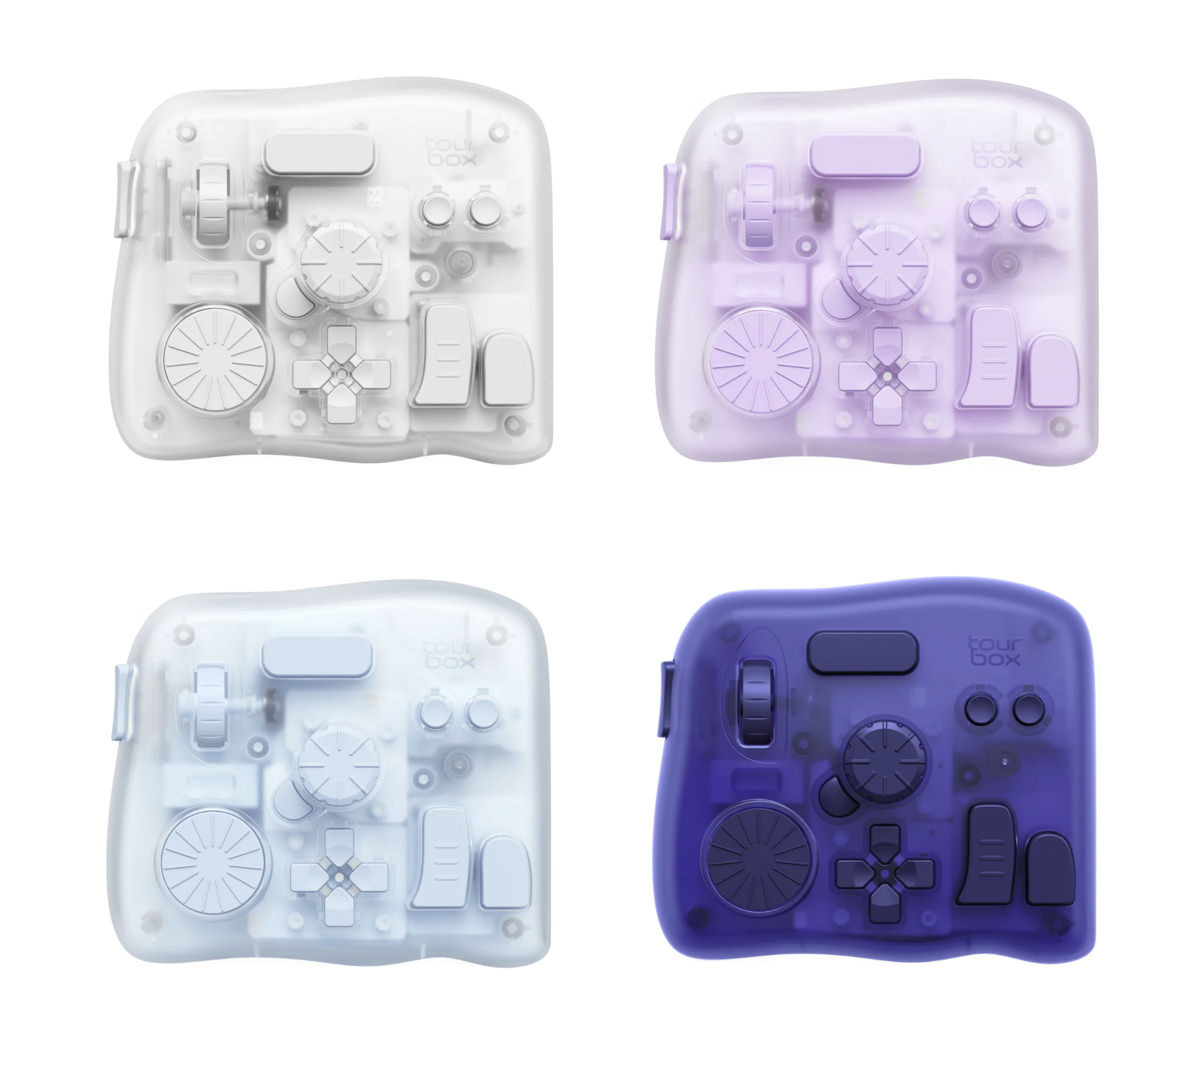
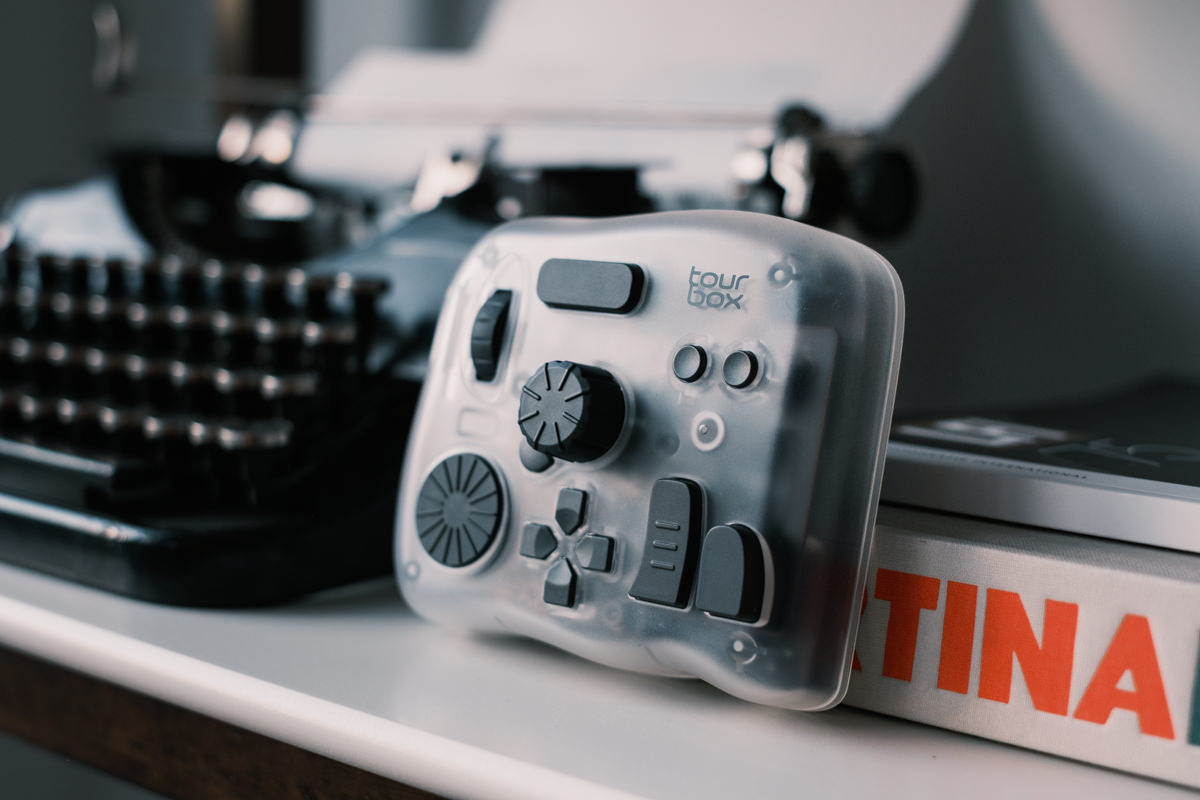
2. New Colors
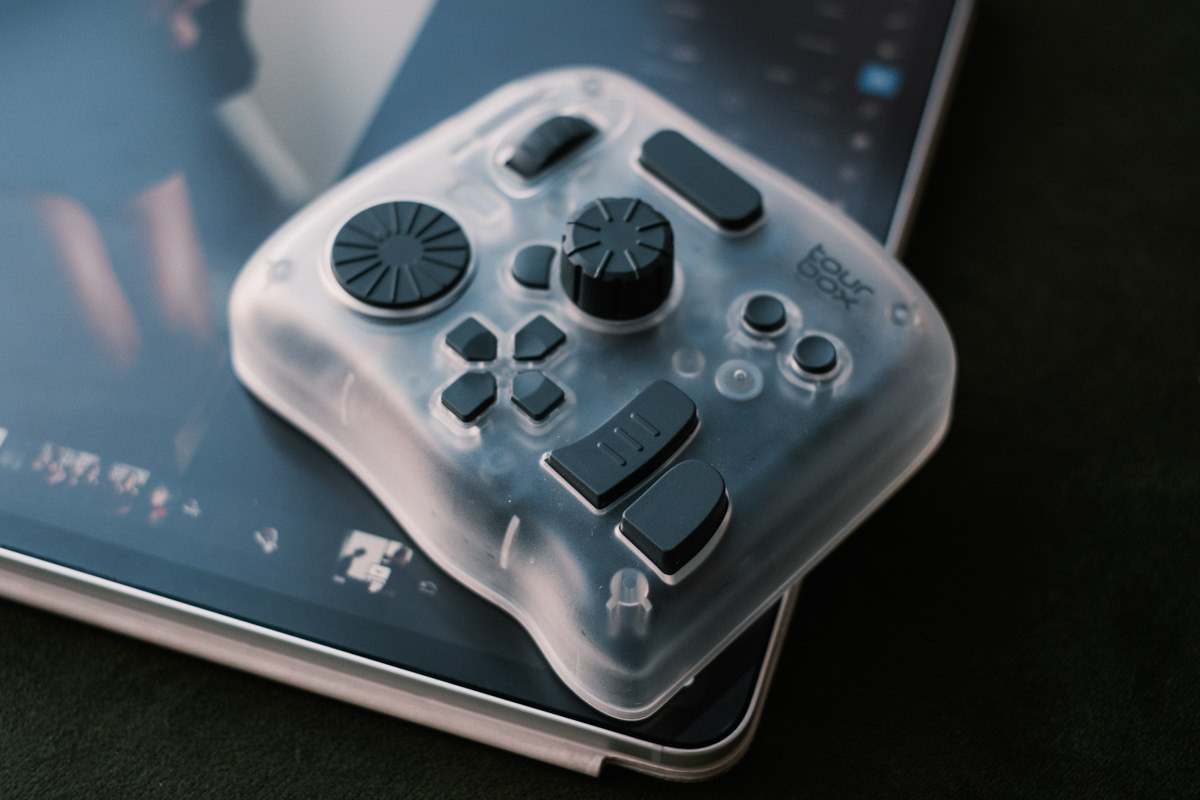
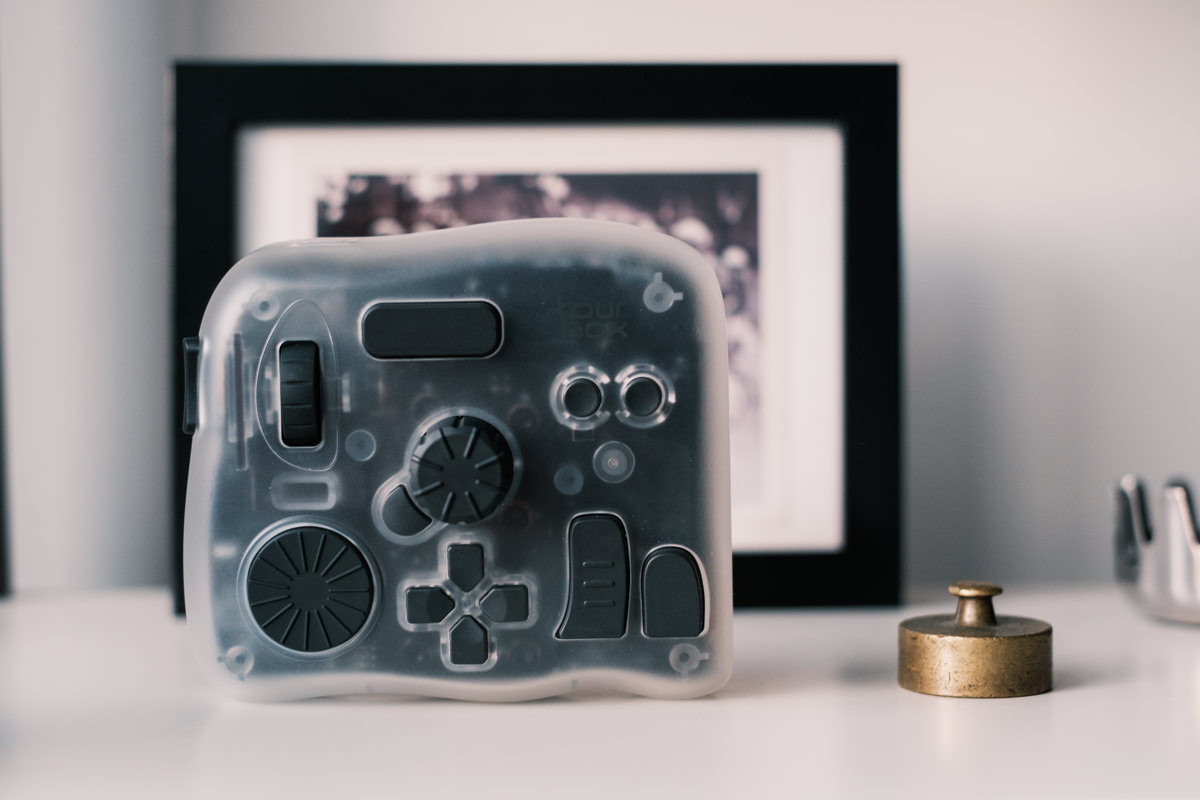
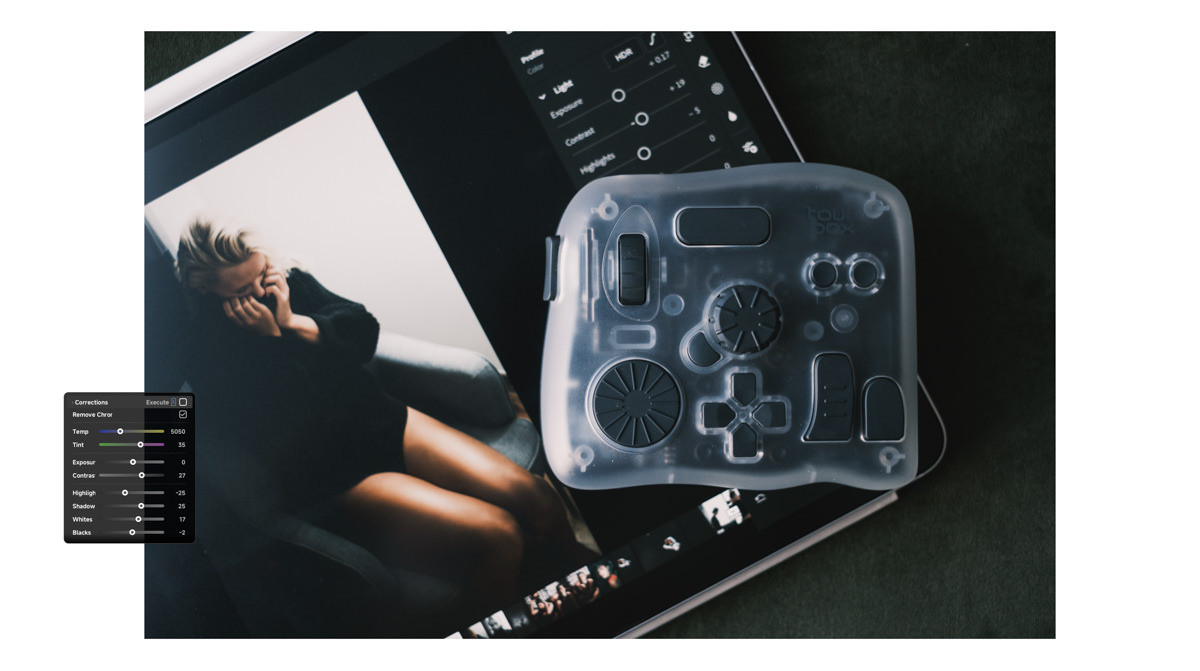
I liked the smooth feel of the rubber on the Elite Plus and I loved the all-white color. But, because my desk and everything on it is exposed to natural light, parts of the device began to yellow after a few years. The new translucent plastic is so clean and nice. The icy opaque look gives you an almost see-through effect into the internal components. It’s a winner for me.
Shortly after the release of the Elite Plus, they came out with four more colorway as part of the Arctic series: Frost White, Glacier Blue, Aurora Violet, and Midnight Indigo. Personally, I want one in Frost White to match my new desk setup.
3. Dual Bluetooth Channel Switching
If you work on across different devices, you can seamlessly swap connections with the new Dual Bluetooth channel switching. This means you can pair with two devices at once and switch by pressing the Bluetooth button on the bottom side of the device.
This could be two computers, or a computer and a tablet.
There’s a small light below the C1 and C2 button that will glow Green when you’re connected by Bluetooth. When you switch, it will glow Orange. If you’re connected by a USB-C cable, it will glow white.
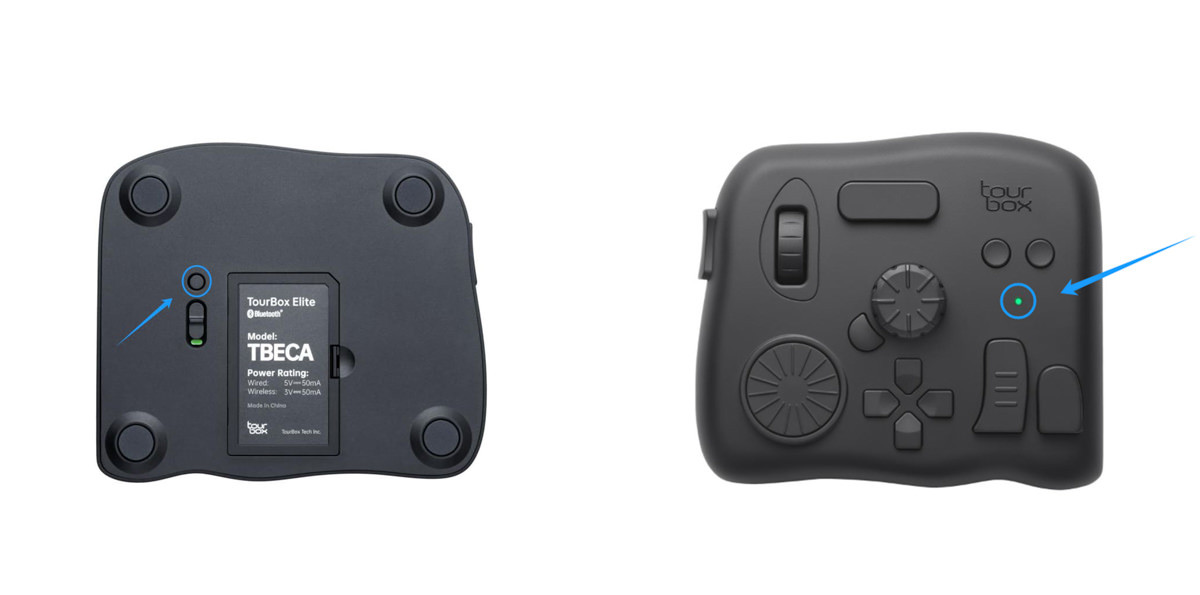
The only requirement is you need to be running macOS 10.13 or later, or Windows 10 or later or have a Bluetooth adapter that supposed BLE 4.2 or newer. If you already have the TourBox Elite Plus, you can find detailed instructions here.
Outside of tablet compatibility and Dual Bluetooth Channel Switching, everything else works the same as the TourBox Elite, so you can read my in-depth TourBox Elite review if you want to learn more about the device in general.
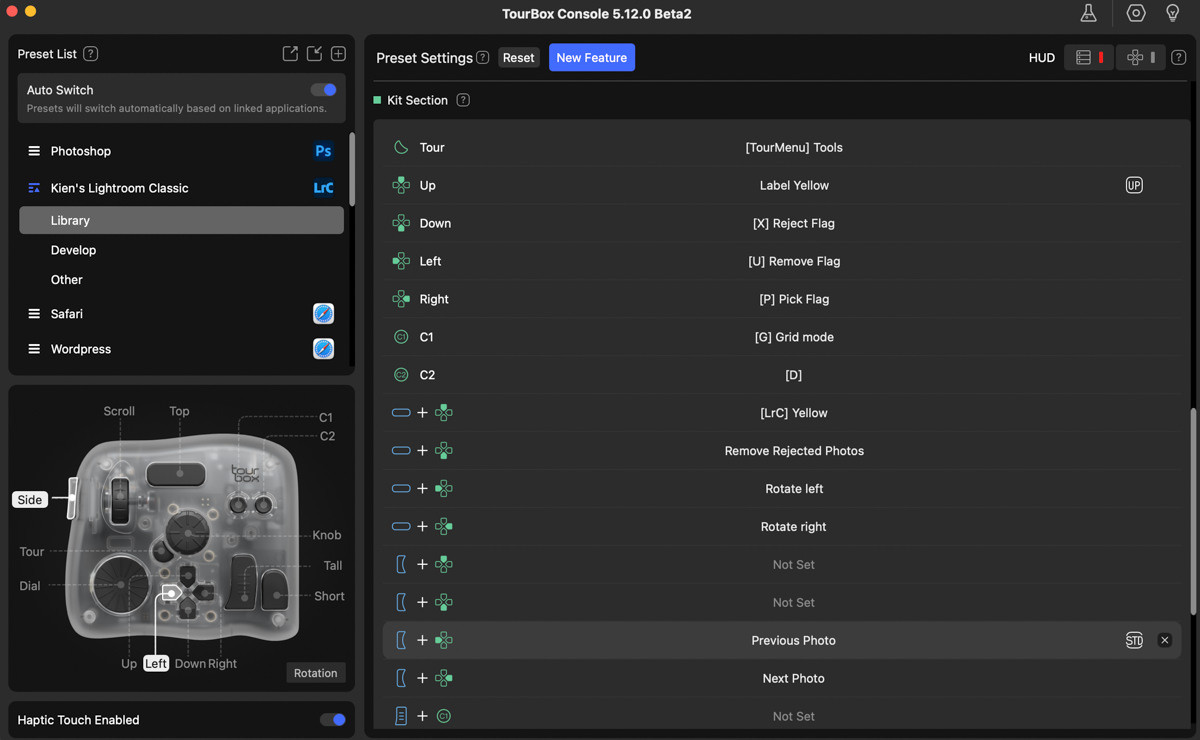
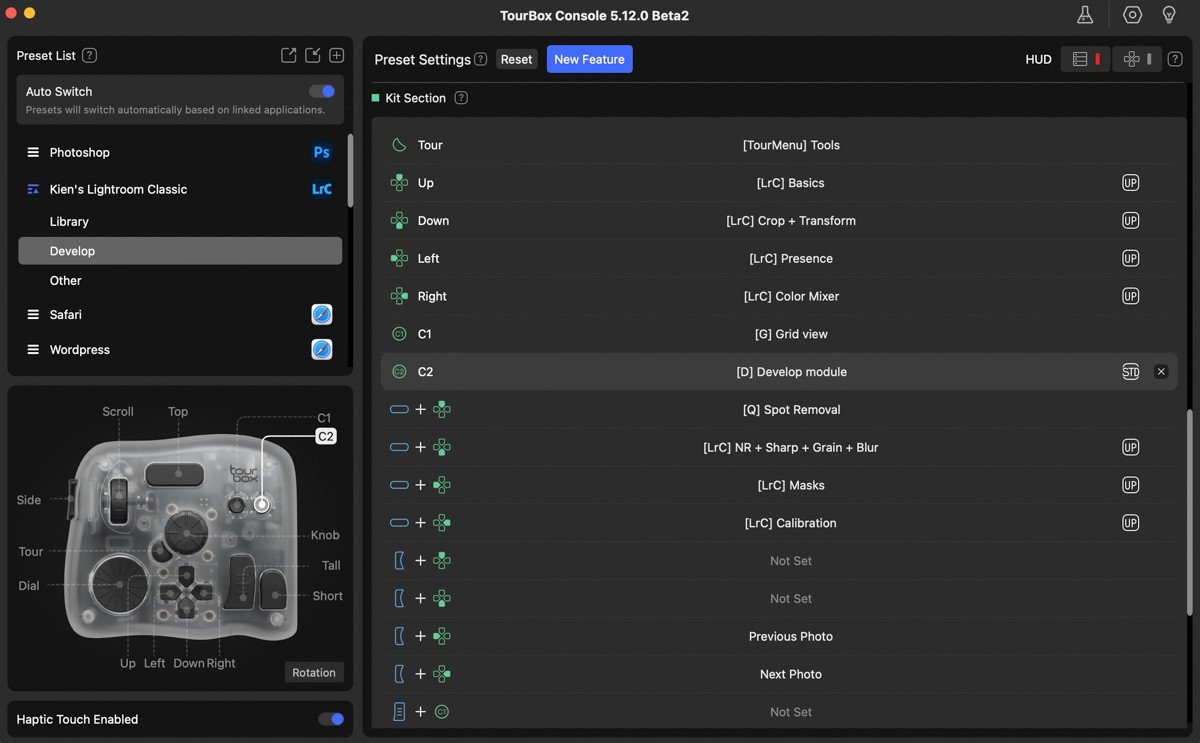
4. Sub-Presets and Workspace Recognition
Introduced with the TourBox Console 5.10 (around October 2025), the software now allows you to create separate sub presets within programs like Adobe Lightroom and DaVinci Resolve. In other words, the Console software now recognizes when you’ve switched workspaces or modules and automatically switches you to a different sub-preset. This means you don’t need one preset that tries to do everything.
In a software like Adobe Lightroom, you can have a customized preset for when you’re culling versus editing and automatically and seamlessly switch. If you work in Lightroom, I breakdown my custom preset and Adobe Lightroom workflow using these new features.
What’s great is that these features are backwards compatible with all existing TourBox devices, and not just the TourBox Elite Plus. One of the things I love about TourBox as a company is they continue to develop their software and make it available to all users.
This Kaizen approach of continuous improvement, especially when it’s offered for free, is rare in a today’s world of subscription-based everything.
As of this writing, the Console software is on version 5.12 Beta with updated features for both sub-presets and the next feature, Dynamic Panels.
5. Dynamic Panels
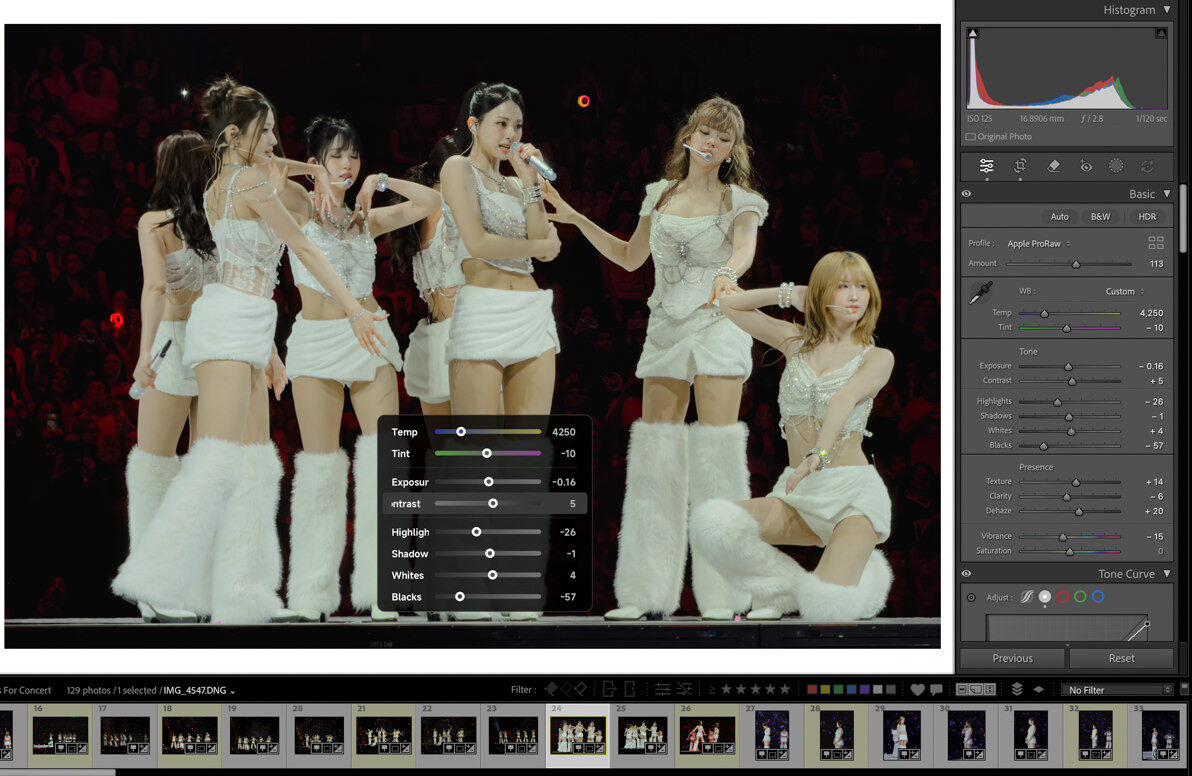
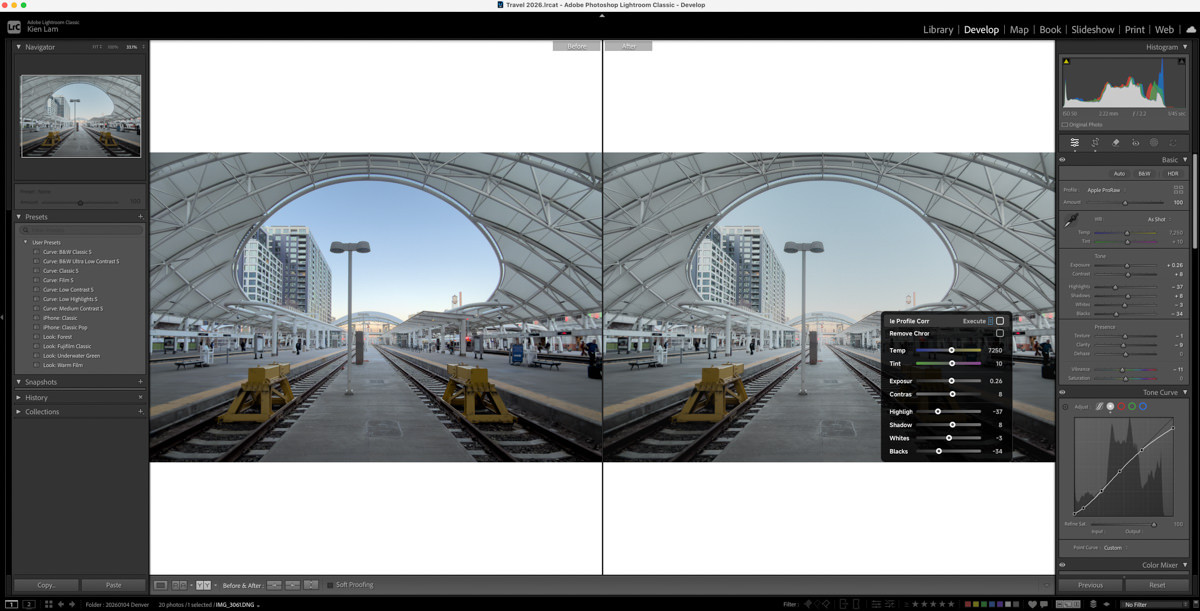
More importantly, Tourbox Console 5.10 also introduced Dynamic Panels, which are customizable floating panels that allow you to edit without using a program native panels. It’s designed with Adobe Lightroom in mind, but I have a feeling that something similar will be introduced for other creative software down the line.
Almost every Lightroom adjustment control that you’d normally find on the right hand side of the screen can be added to your own custom panel. Rather than scrolling through all the adjustment panels, you can group them however you like, and map these groups to one of the Tourbox buttons.
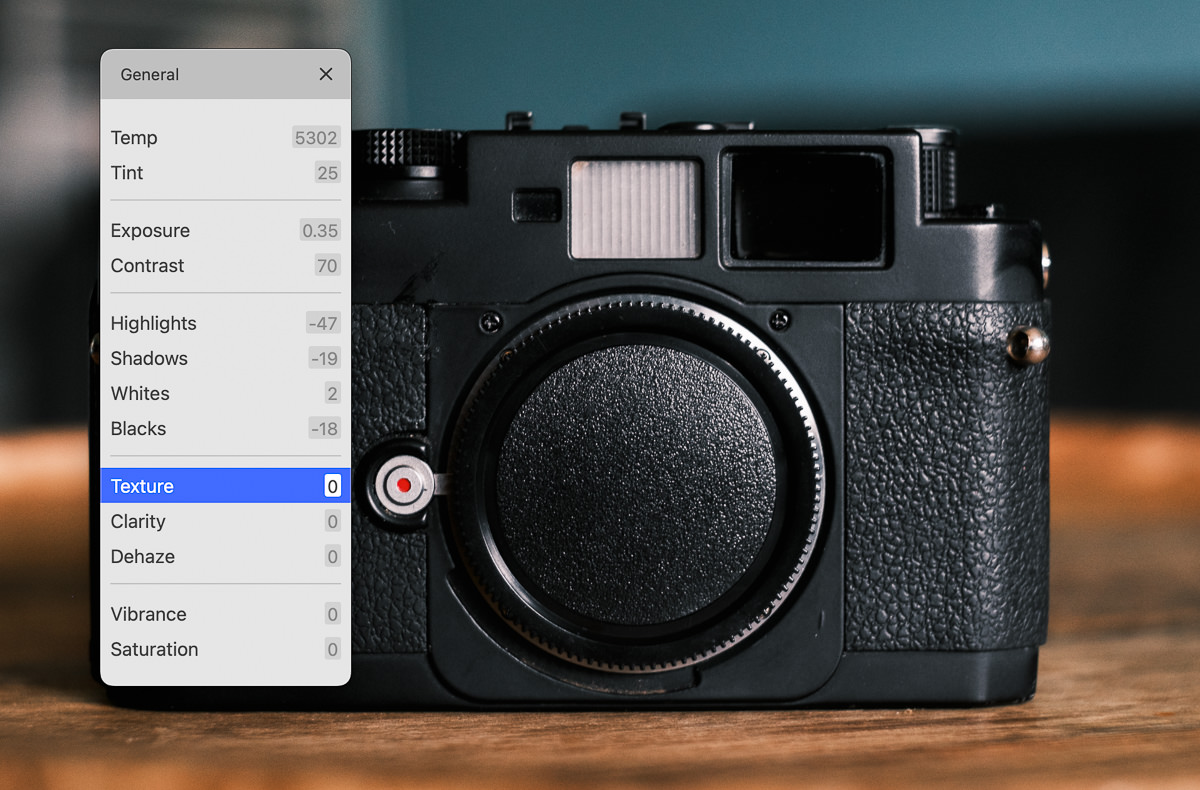
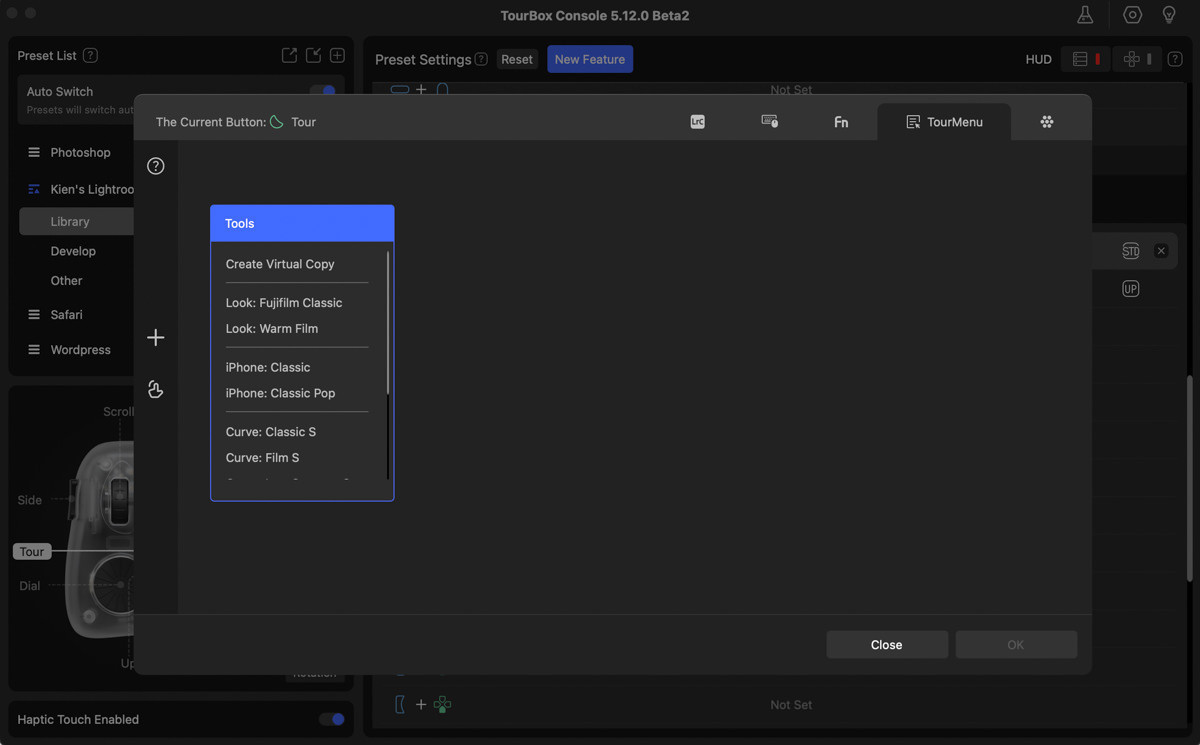
Previously, the software tried to do something similar by allowing you to bring in certain adjustments using the TourMenu. It worked in theory, but the execution left me wanting. However, it laid the foundation for what would become the Dynamic Panels that ports over the adjustments in a way that mimicked the native panels. You can also see below how it wasn’t the most elegant design.
With the new Dynamic panels, you can float it wherever you want on the screen, and can even go into full screen mode, and float the panels on top of the image. This is a very useful feature if you’re working on a smaller laptop screen.
The screenshot below doesn’t do it justice, but I’ve effectively gone into full screen mode (image at 75% fit) with just the image and the floating panel for a de-cluttered workspace. My custom ‘Basics’ panel is opened, but I can call up any of my other custom panels.
Interestingly, the whole integration is seamless. There’s no lag, and it feels like a native part of Lightroom.
In DaVinci Resolve and Final Cut Pro, HoverAdjust allows you to float up the native Color Grading panel and other effects, transitions, and adjustment parameters that you can then control by hovering your mouse cursor over, and using the knob or dials for adjustments.
As I plan to incorporate DaVinci Resolve into my video workflow, I’m excited that these features are being developed.
6. Develop Preset
I’m not sure exactly when it was introduced, but one of first feature I requested long ago was being able to map Develop presets in Lightroom. I have a few of my own presets that I use as a starting point for all my edits and are developed specifically for different cameras, and even my iPhone photos.
I can now create a TourMenu group for these presets, or even multiple groups, and bring it up with a button. Alternatively, I can bring up a Dynamic Panel with these presets.
One Last Thing: UI/Design
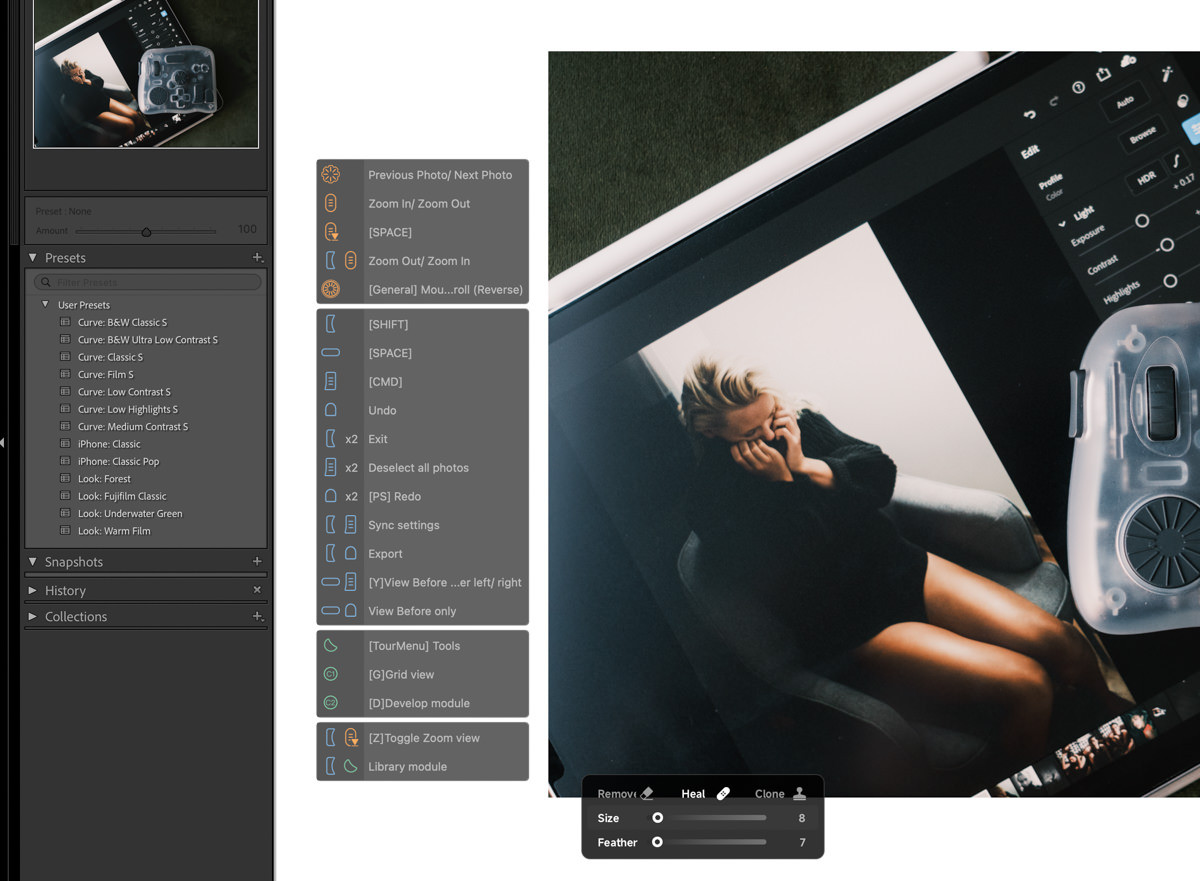
I also have to note how nice the Dynamic Panels look. From a UI design perspective, the TourMenu was functional but Spartan in style. In later versions, you can style how the TourMenu look a bit, which helps a lot and I personally like the Dark mode.
The D-Pad HUD is still ugly, but the new HUD design with its opacity control went in a different, and much better direction that’s carried on by the Dynamic Panels. It’s a small thing to note, but I like how things like the Color Mixers are designed, which makes it infinitely more user friendly than in previous attempts.
The TourBox Console Software Has Come A Long Way Since 2020
When I first started using the original TourBox, I actually created two separate presets to do exactly what the sub-presets now do, since many of today’s features and functions didn’t yet exist. It was too complicated to try to map everything, so I created a ‘Cull’ preset that focused on going through my library to make selects and rejects, and do basic exposure and contrast adjustments. When I was ready to edit, I swapped to a separate ‘Edit’ preset.
In truth, I used the ‘Cull’ preset a lot, but it was still faster for me to edit with a mouse and keyboard. My original idea allowed to use the TourBox like a controller to cull through my images.
As I originally pointed out in my PetaPixel review, I enjoyed the using the physical knobs and dials to make adjustments, but it didn’t work for everything. I still had to go back to the Lightroom panels to play with the tone curves and the Hue/Saturation/Luminance sliders. And, of course, trying to remember where everything was mapped was a pain.
What sold me on finding a permanent space for the TourBox on my desk was how those knobs and dials made working in Photoshop and Final Cut Pro/Premiere so much faster.
In Photoshop, brushes, adjustments, layers, and tools were intuitively mapped and brought up with the physical buttons so I didn’t have to dig through the menus. When using Final Cut Pro, I could quickly scrub through the footage and timelines with the wheels, set in/out markers, favorites, and did all of my speed and retiming with a few clicks. It saved me a lot of time.

But Lightroom was where I spent most of my time. Then TourBox Console 5.6 introduced the TourMenu and macros, which allowed you to create a dropdown menu instead of 1 to 1 mappings. This allowed you to creatively and cleanly organize clusters of functions to one button.
In fact, the menus and macros were very useful for configuring presets for so many other programs on my Mac like Safari, VLC, Notes, Reminders, Excel, Word, Google Sheets, etc.
Pre-loaded Presets And Customizing Your Own TourBox Preset
As of Console 5.12, you can find specifically developed presets preloaded for the following software.
- Photoshop
- Lightroom Classic
- Lightroom
- Final Cut Pro
- DaVince Resolve
- Premiere (Editing + Color Grading Presets)
- CapCut
- Capture One
- CLIP STUDIO PAINT
- MAX/MSP
- Toon Boom
- Avid Media Composer
- MediBang Paint Pro
For new users, the included preset is a good way to start using the TourBox within those software. Once you get an understanding for how things work, you can custom the presets to fit YOUR workflow. Because ultimately, the power of the TourBox is in the software.
Note well. You can buy the TourBox Elite Plus and use it out of the box with the included presets, but if you don’t plan on spending time to learn and customize the presets, you’re missing out.
The software is not overly technical to learn, but it does take some time, so be patient.
My advice is to use a set aside a couple of hours during a real project to customize a configuration that feels right and is easy to remember. I say this from experience, because I just built a completely new Lightroom preset with Console 5.12. It looks nothing like my old ones.
I’ll map, use, adjust, and repeat. Sometimes, I’ll change a mapping several times back and forth until it feels intuitive. A good rule of thumb for me is to make the finger movement as close as possible to how you’d use the shortcut on a keyboard. For example, I set the Side button to Shift and the Tall button to CMD. The placement is very similar to where it would be on a keyboard.
You can also download my own LR Classic preset to play around with it for yourself or go to the official channel page to download curated user presets to get you give you ideas of how the software can be used.
Is The TourBox Elite Plus Worth The Upgrade?
The answer is pretty straightforward, fortunately.
If you want to use your TourBox with a tablet, the Elite Plus is the way to go – especially if you earn a living as a photographer or graphics artist.
If you don’t need the tablet functionality, the Elite offers almost the same function for about $40 less.
If you started with an original TourBox, TourBox Neo or TourBox Lite (both are wired), I think the wireless aspect of the Tourbox Elite or the Elite Plus is worth the upgrade. There’s also a new wireless version of the Lite if you want a smaller, simplified version of the TourBox, but still want to be wire-free.
Lastly, if you just like the translucent look, it currently only comes in the Elite Plus variety. Plus there are 4 other clear ‘Arctic’ colors too. I want the Frost White one myself. They are currently priced at $297 ($284 between April 13 – 30).
You can use promo code Kien10 to get an additional $10 off any Tourbox device.
Final Thoughts
It’s a good time to be using a TourBox. With the Elite Plus model, tablet users are no longer left out. I’m not sure what will come next from a hardware side, but from the beginning, there were always new features to be added and new creative software to be supported. I feel like the company does a really good job of pushing out new updates without forcing users to upgrade or pay for a subscription. This is quite rare in today’s world.
The latest updates covers nearly 95% of all the functions in Lightroom and has a UI that makes customizable very doable, if you have a bit of patience to learn what’s possible. What’s great is that there are a few new updates that are in the works that I’m really excited for.
The list of creative software they support has grown, but what’s great about the Console design is that you can map almost any shortcut and even design macros to do multi-step tasks. This means that you can use it on almost every program or application, even if TourBox didn’t explicitly design for them.
Bottomline, I love try out new hardware, but not everything retains a place on my limited desk space. This one has.
Updated on May 5, 2026