The Best TourBox Elite Configuration For Adobe Lightroom Classic
The Best TourBox Elite Configuration For Adobe Lightroom Classic


I’m one of the early adopters of the TourBox and I’ve owned every device from the Original to the Elite and the new Elite Plus, even playing around with the entry-level TourBox Lite. From the beginning, I pushed for certain features to be adopted, and to my delight, the company listened and regularly pushes out full software upgrades, for free, to improve how every device in their line-up interacts with different creative software.
Personally, Adobe Lightroom is the software I use the most, and it’s also one of the software that TourBox primarily develops around. So, whenever there are major changes coming, I get an update, so that I can update my own preset to take advantage of the new features.
This post has been updated several times over the years, and the latest one (April 2026) incorporates all the newest features in TourBox Console 5.12 Beta. This includes the new workspace recognition, module switching, and dynamic panels. I don’t change my TourBox settings that’s often, but this one warranted a completely new preset from scratch to take advantage of the sub-presets for when you’re changing between the Library and Develop modules.
There’s no reason for me to gate-keep this, so I’m offering my preset for anyone who wants to use it as a base to customize their own preset.
You can download my Lightroom Classic Preset HERE for free.
If you don’t yet own a TourBox, this post can give you an idea of what a good Adobe Lightroom Classic workflow looks like with the TourBox. You should also read my new post that breaks down the entire line-up of TourBox devices in 2026 and what I recommend.
You can also get an additional $10 off any TourBox device with promo code KIEN10 at checkout.

I was previously using the wireless TourBox Elite, but this preset works with the original TourBox and the TourBox Neo. If you’re using Tourbox Lite, it’s possible to adjust it for your own use, but the TourBox Elite or the new TourBox Elite Plus is the device I recommend, for future proofing.
April 2026 Update: The newly released TourBox Elite Plus now works with tablets and has Dual Bluetooth channel switching. Physically, the Elite Plus looks identical to the Elite, but comes in a translucent color way.
Out With The Old, In With The New Console 5.12
When I first started using the TourBox and the earlier versions of the accompanying Console software, I had the idea to create two separate presets for Lightroom: one just for selecting and culling my photos and a second one for editing. This was done so I can free up the D-Pad, buttons, and dials to maximize what I can map.
I’ve always said that the Console software is more important the TourBox itself, and that’s because the company takes a Kaizen approach to continuous improvement, and pushes the updates out so that it works with all the existing devices.
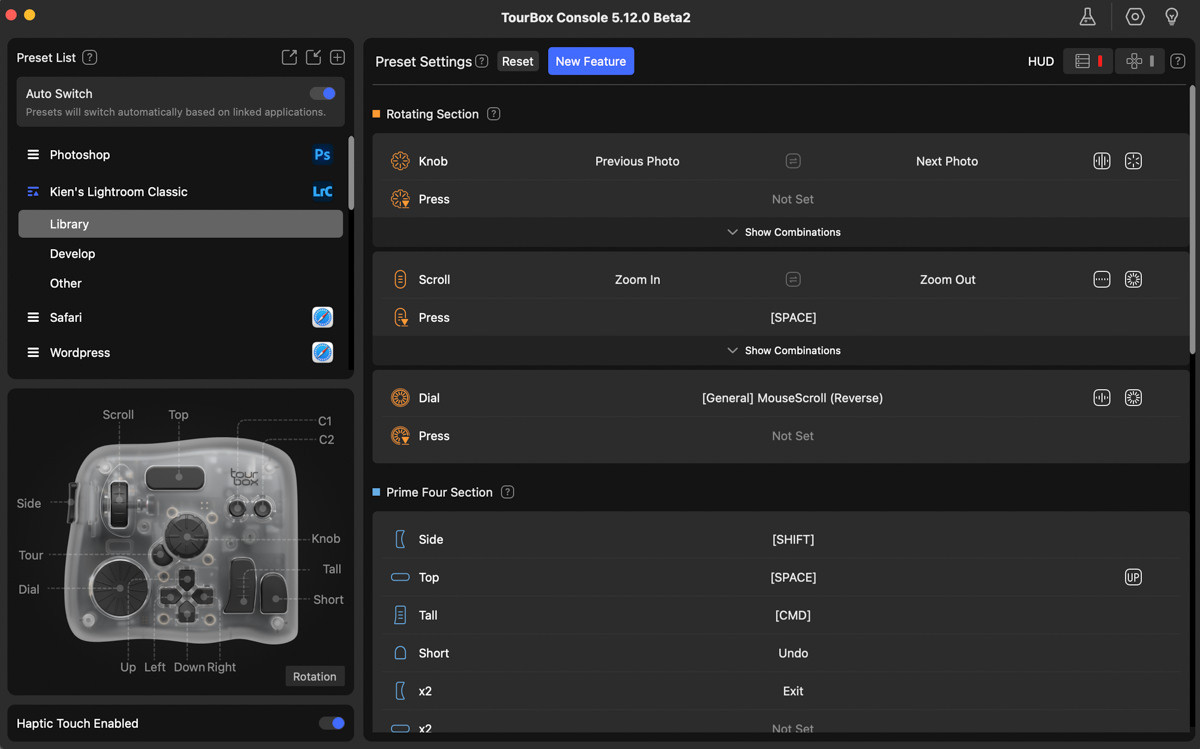
The software has come a long way. Luckily for those using the TourBox after October 2025, Console 5.10 introduced Sub-Presets, Workspace Recognition, and Dynamic Panels, three features that had me creating a brand new SINGLE preset that handles my Lightroom Classic workflow better than ever.
Currently, I’m using Console 5.12 beta. You can always download the latest software here.
I’ve introduced these new features in my long term review of the new TourBox Elite. I recommend you give that a read first.
Workspace Recognition: An Overview
One of the most useful new feature is the ability to recognize which module or workspace you’re currently in Lightroom. For most people, that’s the ‘Library’ where you can review, select, and rate your photos, and the ‘Develop’ module where you make adjustments.
The Tourbox Console now allow you to create separate presets for each module. You get one set of configuration for when you’re going through the culling process, and another one for editing, effectively freeing up some of the buttons, almost the way I did it manually a few years ago, but better.
Dynamic Panels: An Overview
A few years ago, Console 4.0 introduced TourMenu and macros, allowing you to create dropdown menus. This was a game changer, that drastically increased how many functions you can map to your TourBox.
Now Console 5.10 has brought in Dynamic Panels, which allows you to create custom floating panels with any or almost all of the functions within Lightroom’s adjustment panels. A basic example, let’s say you only make a handful of adjustments every time in Lightroom, instead of scrolling through all the adjustment panels on the right side of the screen, you can now bring just those 4-5 adjustments all together in one custom panel that can appear anywhere on the screen.
Or, you can create multiple clusters of adjustments and map each group to a button – like I did.
I know it’s a bit confusing, and it actually took me some time to realize how powerful this feature was, and to make it work for me. Now it’s changed my workflow. Let’s first go over the basics of the Tourbox again for those who are new.
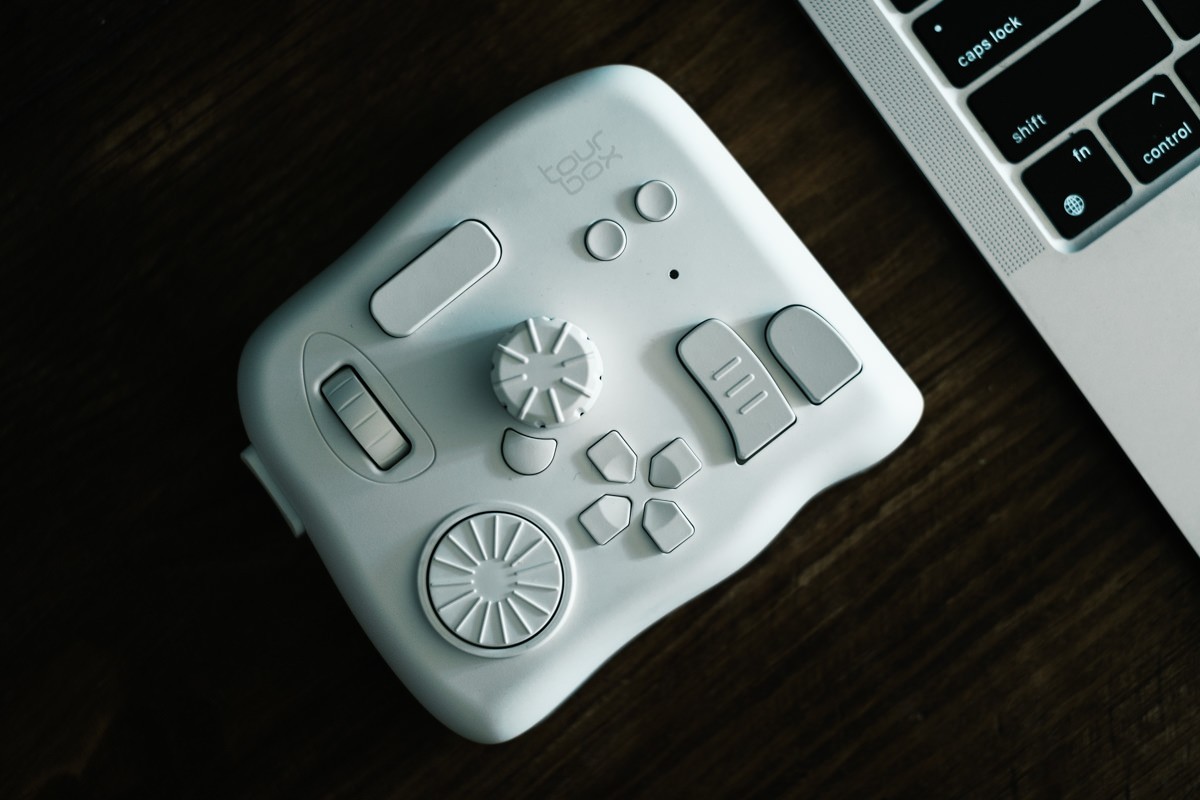
TourBox Layout Configuration
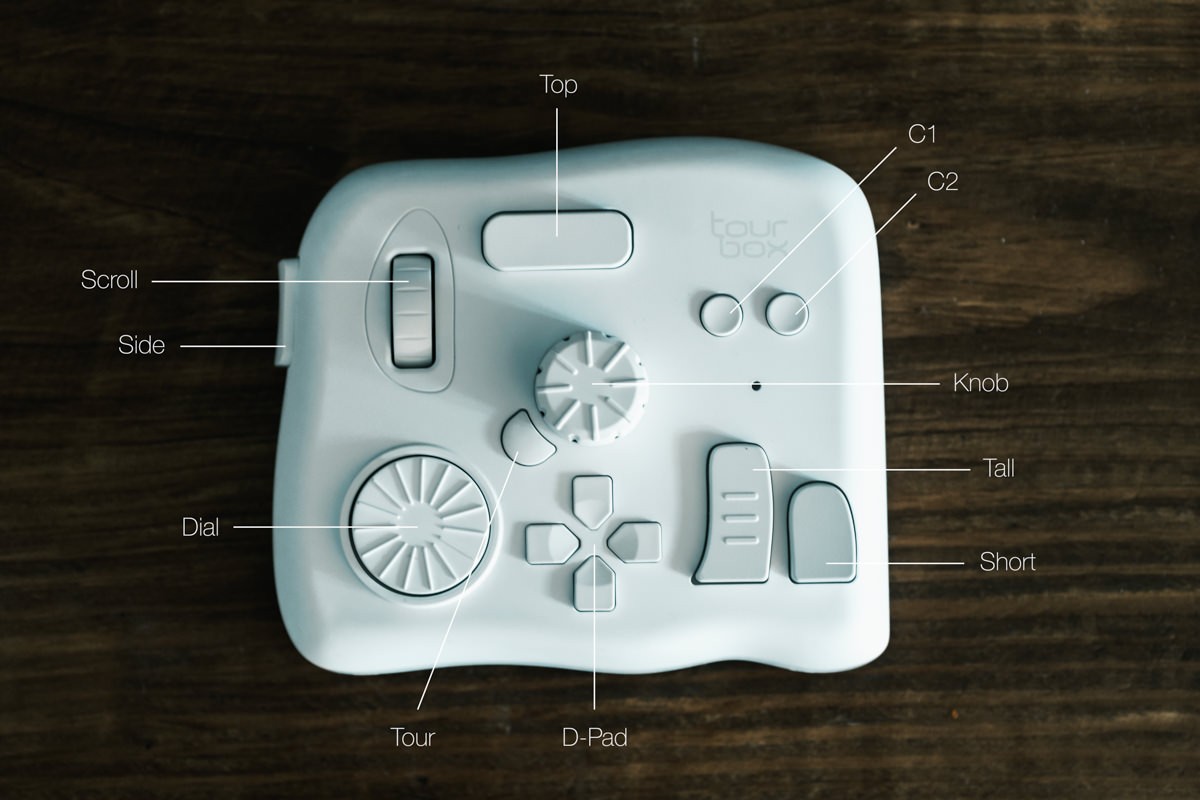
These are all the button, wheels, and dials that are on every TourBox except for the TourBox Lite, that does away with the D-Pad, Dial, and Side Button.
While all the buttons look different, you basically have 11 click-type buttons, and 3 rotate-style wheels (that also click). You can click, double click, and even do two-button combinations. Together, there are A LOT of possible mapping potential, and even more when you utilize TourMenus.
The Basics Of Making Your Own Lightroom Preset
The first rule: Don’t try to map everything.
The single hardest thing about using a TourBox is remembering what you mapped.
You’re not throwing away your keyboard or your mouse. The TourBox should complement, not replace. The sadist in me has tried, and failed many times trying to do this. Luckily, with the TourMenus, Dynamic Panels and now the Sub-Preset switching, it’s a lot easier.
The second rule: Keep things the same.
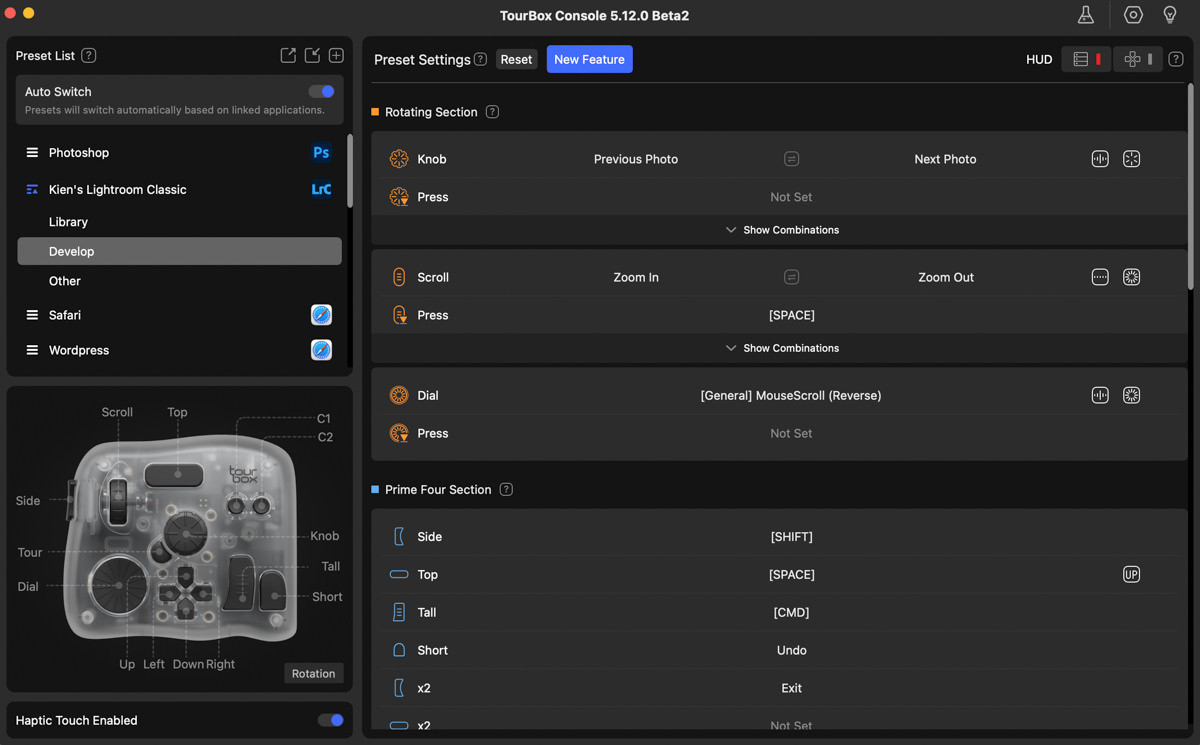
When switching between the ‘Library’ Module and the ‘Develop’ Module, I want to keep as many buttons the same as possible. First, I needed a way to switch between the ‘Library’ and ‘Develop’ module.
C1 = G (Library)
C2 = D (Develop)
I use all the major Prime Four buttons as basic commands. This is the same for both presets.
Side = Shift (Double-tap to ESC)
Top = Space
Tall = CMD
Short = Undo (Double-tap to Redo)
You can see that almost all the commands in the Prime Four section are similar. Where they differ are commands that only work in one of the modules, like Rename, which only works in the ‘Library’ module, and View Before/After, which only works in ‘Develop.’
Library Module Sub-Preset: Culling
Previously, I used the D-Pad and Tall/Short button in a very straightforward way: Navigation and Selection. I move back and forth with the D-Pad, Reject (R) with the Tall button and Unflag (U) with the short button to undo a rejection. It’s ergonomically comfortable and makes sense, but in the new version, I’ve already mapped away the Tall/Short buttons.
Instead of using the four D-Pad buttons just for navigation, I use the Knob to move forward and back. Previously, the knob was too sensitive, but you can control the speed now, and it works well for going through one photo at a time. This frees up the D-Pad button.
Up = 7 (Yellow Label). I use this to highlight my favorite photos instead of using P (Flagged) because it’s easier to see the color box around the photo than the little white flag.
Down = X (Rejected)
Left = U (Unflagged). This removes any flags.
Right = P (Flagged)
Note: Be sure you have Auto Advance on, so you move on to the next photo after you reject or pick it. It’s under Photo > Auto Advance.
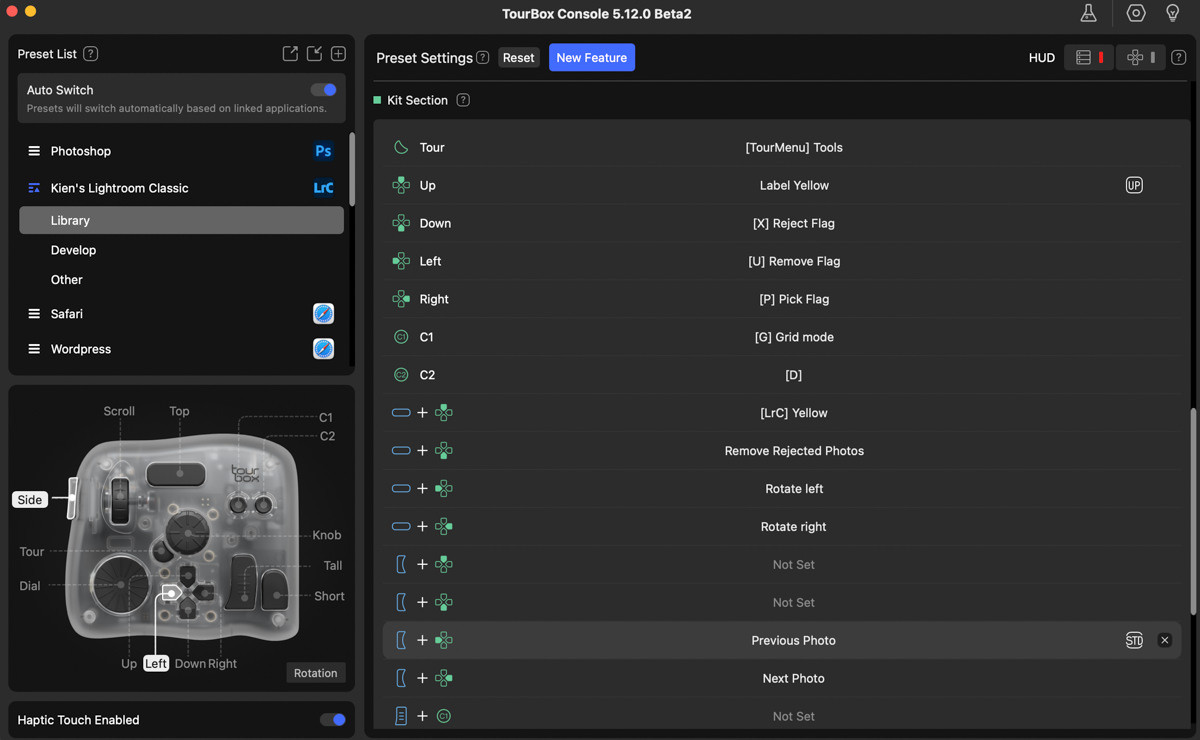
Now, using the Top Button + D-Pad combo, I can map four more shortcuts. Here, I’m still trying to make it easy to remember.
Top + Up = Filter for all Yellow photos. Remember, the Up button alone gives a photo the Yellow Label.
Top + Down = Remove All Rejected Photos from Library. This is how I declutter my library.
Top + Left = Rotate Left
Top + Right = Rotate Right
Culling Workflow: How It Works For Me
In the ‘Library’ module, I use the Knob to scroll through my photos one at a time, using the Down/Up buttons to reject or favorite a photo. If I want to view an image larger, I use the Top button. The Scroll wheel allows me to zoom in and out on an image. Alternatively, I can press the Tall button (CMD) and use the mouse to zoom in a section of an image.
If want to batch select, I press the Side (Shift) and use the Knob or mouse to click on the last image in the series.
When I’m done, I press Top + Down to remove all the rejected images.
Develop Module Sub-Preset: Editing
In the ‘Develop’ module, I use the D-Pad to open up all my main adjustment panels. Using the Dynamic Panels feature, I created 4 grouping of the adjustments that I use regularly.
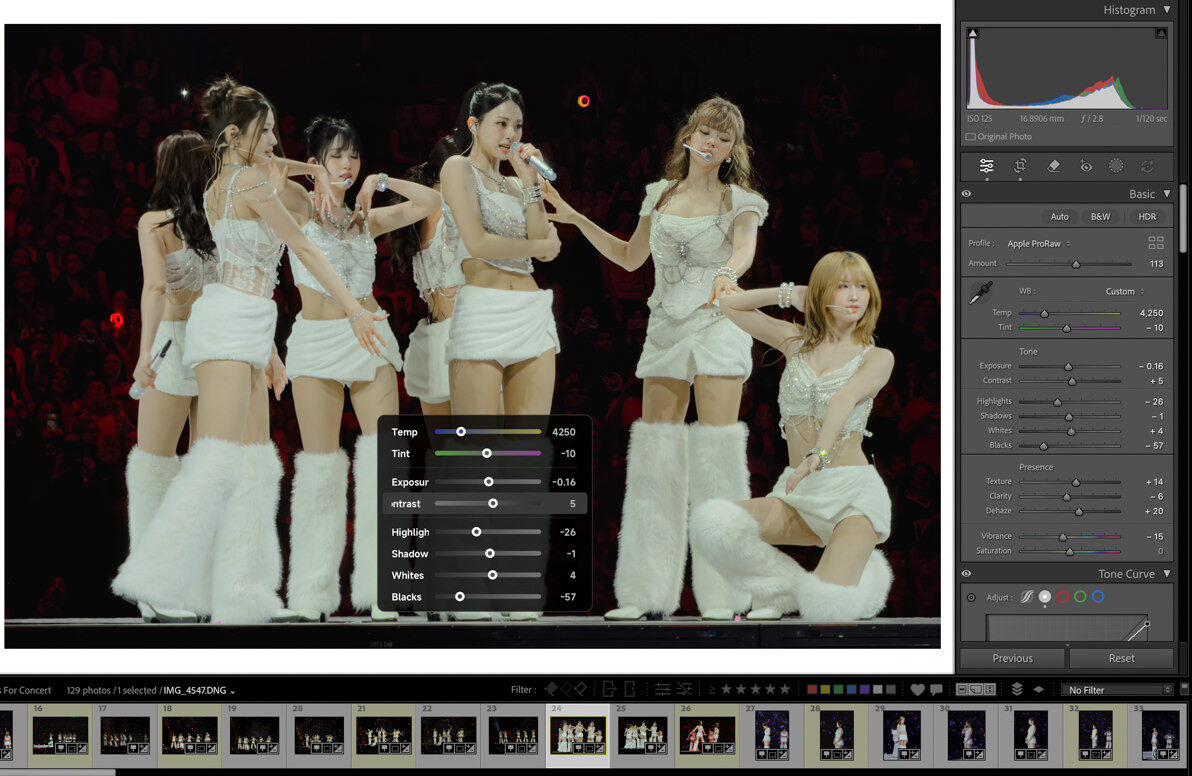
Up = Basics (Exposure, Contrast, Highlights, Shadows, Whites, Blacks)
Down = Crop + Transform (Crop, Angle, Reset, Vertical Transform, Horizontal Transform, Manual Distortion Amount)
Left = Presence (Texture, Clarity, Dehaze, Vibrance, Saturation, Tone Curve)
Right = Color Mixer (HSL Mixer)
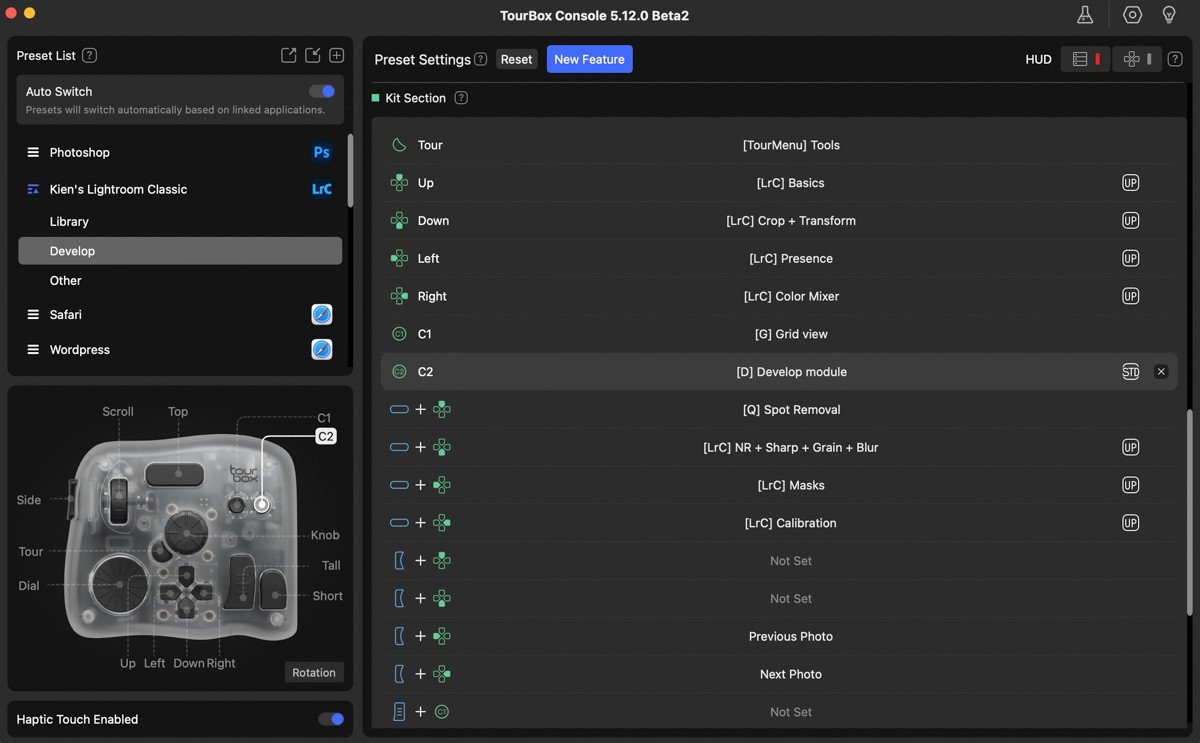
Using the Top + D-Pad combos, I created four more shortcuts, this time, for Tools and Effects.
Top + Up: Remove Tools (Remove, Heal, Clone)
Top + Down: Noise (Noise Reduction, Sharpening, Grain, Blur)
Top + Left: Masking (Select Background, Select Subject, Select Sky, Select People, Object, Brush, Linear Gradient, Radial Gradient)
Top + Right: Calibration (Red Primary, Green Primary, Blue Primary)
Essentially, using 8 buttons, I can map almost every Lightroom Adjustment. In the past, this was not possible. And even with the TourMenu, I was only able to do it with some of the functions, but not all.
Editing Workflow: How It Works For Me
When I am ready to edit a photo, I will press the C2 button to go into the Develop module, using the D-Pad, I can open up my custom adjustment panels: Basics, Presence, Color Mixer, Crop + Transform.
A Dynamic Panel will open with all the sliders that I want to adjust. I use the Knob to slide back and forth and adjust the values. I can use the mouse or the Scroll wheel to go between each line item. I find it easier to use a mouse for this.
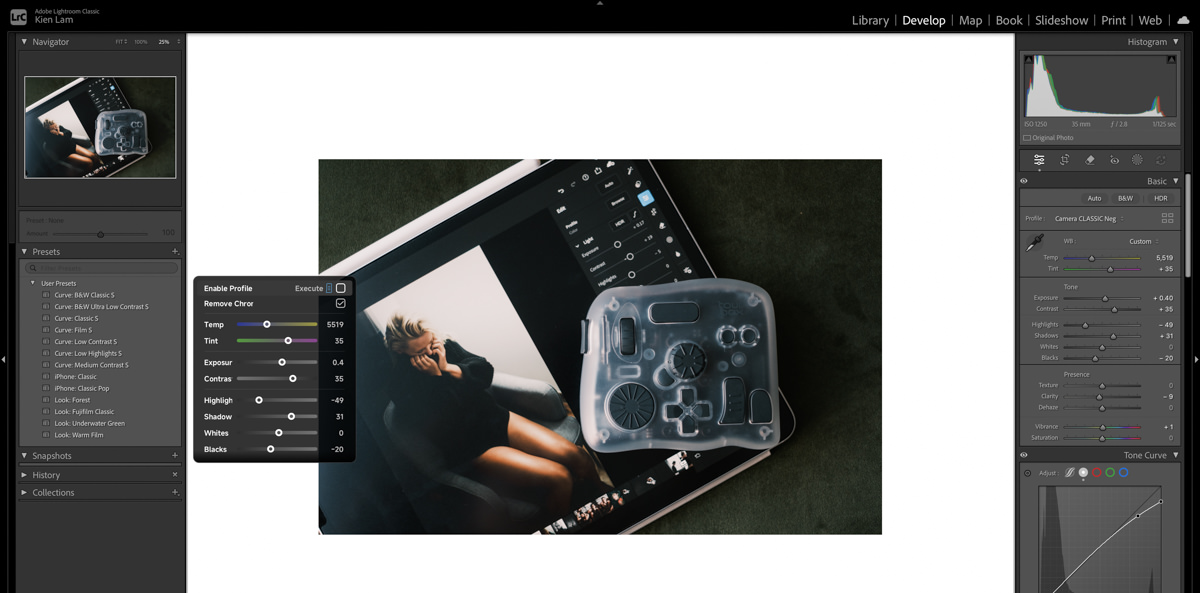
The benefit is with one click I can quickly bring up something like the HSL color mixer, instead of having to scroll down. If I then want to change exposure, contrast, transform, or change clarity, another click that slider up. Again, no scrolling up and down. It might not seem like much, but it saves a lot of time over a long edit session.
Usually, I like to adjust exposure and contrast first, and then apply one of my custom develop presets.
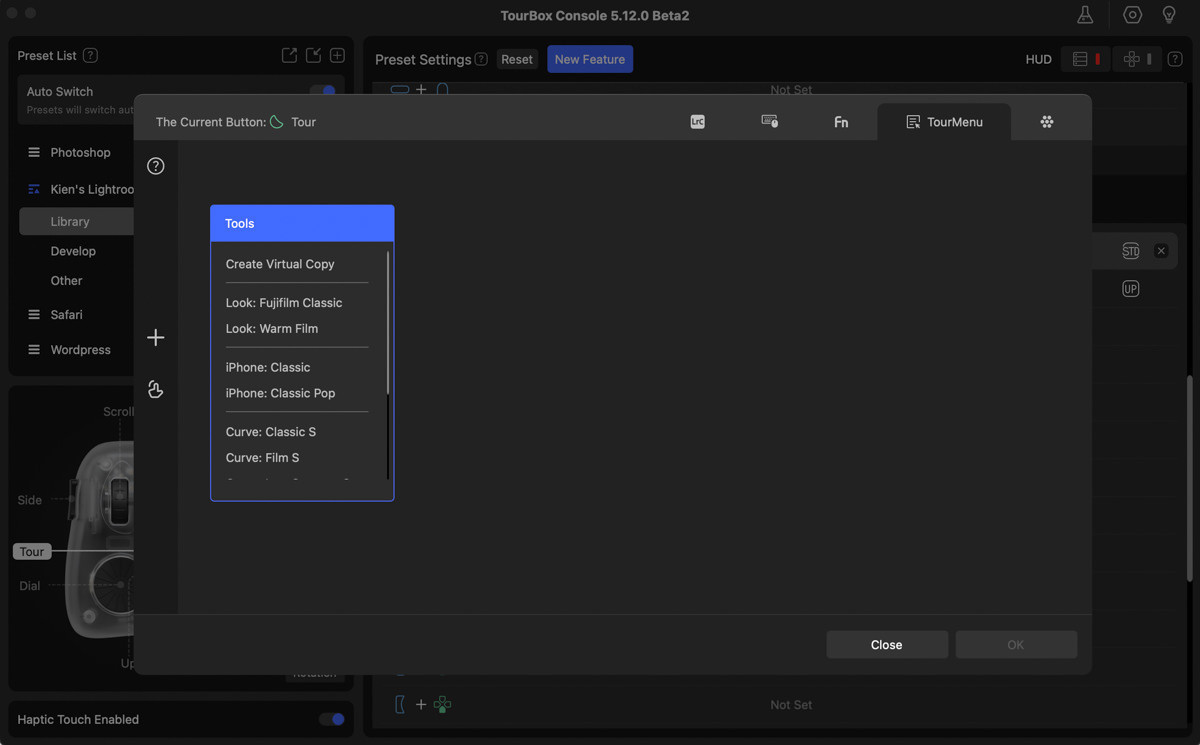
The Tour button is mapped to open up a Dynamic Panel with my favorite presets, so again, I don’t have to go to the left side of the screen and go through every preset. I can simply create groups of my favorite presets and assign them to different buttons.
Note: If you use my TourBox Lightroom preset, you’ll need to select your own Develop presets within Lightroom.
When I like an edit, I’ll use the Side (Shift) or Tall (CMD) button to batch select a set of photos, and then use the Side + Tall combo to Sync Settings. Side + Short will bring up the Export menu.
How I Used To Map The Buttons
This was a section from the original post. I’ve left it to show you how I used to map things, just to give you a sense of how much has changed.
Tall button selects Exposure.
Short Button selects Contrast.
Double-clicking the Tall button selects Temperature.
Double-clicking the Short button selects Tint.
Up button selects Highlights.
Down button selects Shadows
Left button selects Blacks
Right button selects Whites
Side + Up selects Clarity
Side + Down button selects Dehaze
Side + Left button selects Vibrance
Side + Right button selects Saturation
Top + Up button selects Texture
In practice, it was almost impossible to remember the mapping, so I gave up using the TourBox for editing and mostly used it for culling.
Final Thoughts
It’s a good time to be using a TourBox. With the Elite Plus model, tablet users are no longer left out. I’m not sure what will come next from a hardware side, but from the beginning, there were always new features to be added and new creative software to be supported. I feel like the company does a really good job of pushing out new updates without forcing users to upgrade or pay for a subscription. This is quite rare in today’s world.
The latest updates covers nearly 95% of all the functions in Lightroom and has a UI that makes customizable very doable, if you have a bit of patience to learn what’s possible. What’s great is that there are a few new updates that are in the works that I’m really excited for.
The list of creative software they support has grown, but what’s great about the Console design is that you can map almost any shortcut and even design macros to do multi-step tasks. This means that you can use it on almost every program or application, even if TourBox didn’t explicitly design for them.
Bottomline, I love try out new hardware, but not everything retains a place on my limited desk space. This one has. You can bookmark this page because I will update my preset form time to time with major updates.
You can download my Lightroom Classic Preset HERE for free.
Updated on April 20, 2026


Hi,
can you please share a screenshot of your panels? I am trying to get your set up working, especially the ‘select highlights/exposure/etc and adjust with knob’; i don’t seem to be able to adjust with the knob.
Thank you, Martin
Just updated the post with a new preset and screenshots.