How To Take Better Travel Photos: Exposure
How To Take Better Travel Photos: Exposure


This is the first in my series of write-ups on “How To Take Better Travel Photos”. In this series, I’ll do my best to cut through all the jargons and break down the different elements that make up a good photograph. At a high level, an image is made up of a technical component and an artistic one. Without a firm control of the technical side, an otherwise beautiful image could be ruined because of blurriness or bad exposure. Let’s avoid that.
What Is Exposure?
Exposure, or what you see once an image is captured, is basically a combination of the aperture, shutter speed, ISO and white balance. If you’re new to this or have been too afraid to turn the dial to the M setting, check out this little tutorial to understand the basics. Below, I’ll go over them as far as how they affect the final image. Essentially, by choosing a combination of aperture, shutter speed and ISO, you are telling the camera that this is the specific amount of light you want the camera to capture. The white balance will tell the camera what type of light you are shooting in. I’ll go into brief details on the basics. Skip this next section if you already understand this stuff and jump ahead.
Understanding Aperture
Aperture is the opening at the back of the lens that controls how much light you are capturing. The bigger the aperture, like a setting of f/1.8, the more light you are allowing into the aperture diaphragm and therefore the brighter the image will be. The opposite is true for a lower aperture, f/16. Note the smaller number after the f/, the bigger or faster the aperture. It may not seem intuitive, but that’s just how it is. Find a way to remember that.
Additionally, a bigger aperture will create a shallower depth of field, which will give you that blurry background look like in the photo below that I shot the image at f/2.8. The ferns in the foreground and background are both out of focus, while only the Maori men on the boat are in focused.

A smaller aperture will have capture more depth and therefore more of the foreground and background will be in focus, which is something you generally want when you are shooting landscapes and want everything to be clear and visible.
What Is Shutter Speed?
Shutter speed is the length of time the aperture diaphragm is opened to allow light to be captured. The faster the shutter speed, like 1/1000th of a second, the less light is captured and therefore will result in a darker image. The slower the shutter speed, like 1/10th of a second, the more light is allowed through and therefore a brighter image will result. A faster shutter speed will tend to freeze a subject in motion and therefore is required when your subject is moving fast. A slower shutter speed will result in a blurry image if the subject is moving faster than the shutter speed.
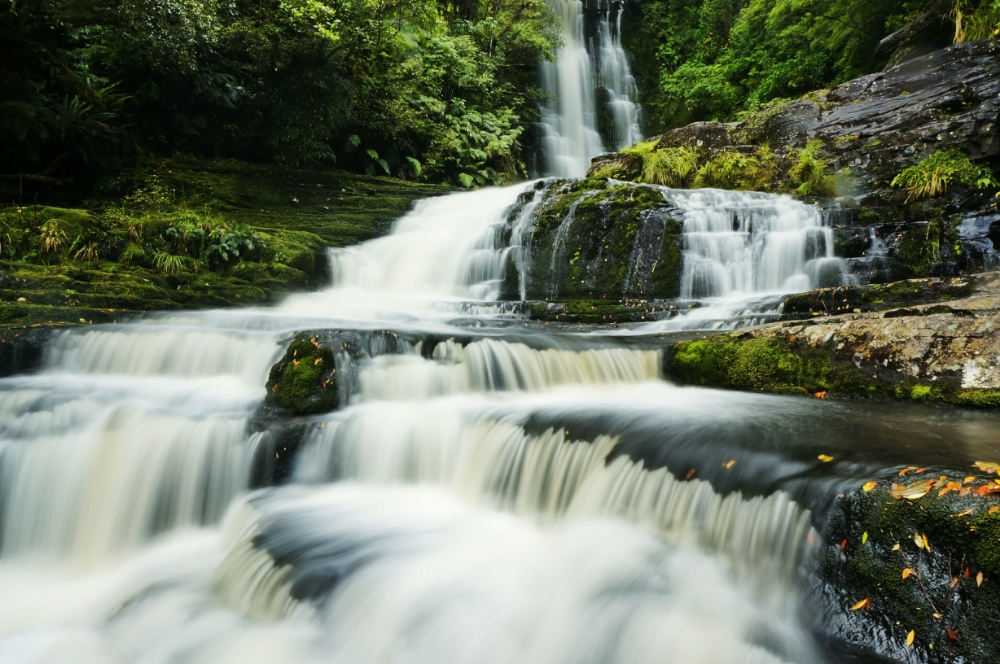
In the photo above, I used a tripod and a slow shutter speed of 10 seconds to keep everything sharp, except for the movement of the water.
What Is ISO?
ISO measures the sensitivity of the sensor to light as far as digital cameras are concerned. The higher the ISO, the more light you will be capturing, but at the expense of a slightly degraded image quality. Shooting with a high ISO like 3200 or 6400 will result in a noisier and grainer image than if you shot the same image at ISO 100 or ISO 400.
What Is White Balance?
While our eyes adjust to the change in the temperature of light around us (that’s right, light has a temperature), our cameras need to compensate for this. On the Kelvins scale, the temperature of daylight is warmer than when you are indoor under a florescent bulb. All this means is that you need to tell the camera what kind of lighting you are shooting in so that it can compensate correctly. Choose the little sunshine symbol when you are shooting in daylight. There’s usually also a setting for Tungsten, Florescent, Cloudy and Flash. You can even choose this number in Kelvins ranging generally from around 2000K to 8000K.
Enough With The Boring Stuff
It’ll serve you well to have this stuff under control as soon as possible. The more you practice shooting and choosing the right combination of aperture, shutter speed and ISO to get the “correct” exposure, the faster you can make adjustments when you are out shooting. You don’t want to miss capturing a moment because you’re busying wondering which way to spin the dial. I promise you, practice, practice, practice, and getting the right exposure will almost become an afterthought.
Is There Such Thing A Correct Exposure?
There are plenty of wrong exposures, but I think that there is also a range of “correct” exposure. Somewhere in this range, the image is generally pleasing to the eye. An important thing to remember when you see a scene worth capturing is that our eyes can see a wider dynamic range of light. We are able to simultaneously see the details in the clouds and within the shaded area it covers. Your camera sensor may not.
You’ll notice this when you try to auto-expose a shot of someone standing with the sun or a bright light source to their back. The subject will usually be completely dark while the background looks fine. Alternatively if you expose for the subject, the background will look completely white and blown out. Another example is shooting a sunset. When you get the colors of the skies right, the ground will be completely dark. It can be annoying but, fortunately, there are several ways to solve for this little dilemma.
Don’t Shoot In High Contrast Conditions
This is the easiest solution. Don’t shoot when the sun is harsh and overhead. Wait for better and even lighting conditions. When the range of light is not so wide, it is easier to capture the details in both the light area and the dark areas. Early morning and late afternoon will provide this type of softer light that is more diffused and pleasing to the eye.
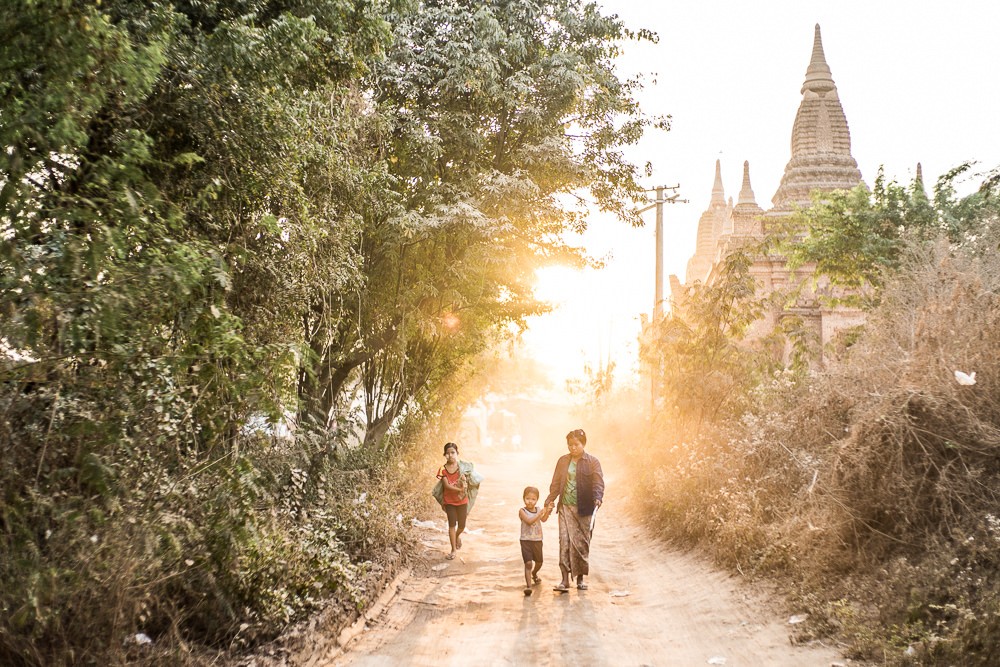
Shooting at “Golden Hour” just before sunset gives you a much softer light and also allow you exposure for the shadow or darker areas in the photos, like this family, while still retaining some color information in the highlights, or the bright area.
Avoid shooting in the shade and sun at the same time. You will need two drastically different exposure to capture each area correctly, which means that you will incorrectly expose one part of the image no matter which exposure you choose.
But who can sit around and wait all day for the light to be “just right”?
Note that while I’m telling you to avoid shooting when the sun is harsh, I’m not saying you should never do it. There are great opportunities to shoot in high contrast light, if you are doing so deliberately.
Shoot In RAW And Edit
When you are shooting in JPEG mode, your camera will take the image you’ve captured, apply its own bit of post-processing to make the image better and then compress all that information down to a manageable files size. This is fine for most people, but if you plan on editing your images, shooting in the RAW format will allow you a greater amount of control in post-processing to correct for the exposure and white balance without heavily degrading your image quality. Practically speaking, you are able to change the exposure to darken a part of the image that is too bright and lighten up the part that is too dark. The result is an image with more even lighting.
When I shoot with the intention of correcting the exposure during post-processing, I try to avoid an exposure where any important areas are too dark or completely blown out without any details. Choosing a middle ground will allow me to capture all the details I’ll need in RAW. I will then proceed to bring those details out in an image editing program like Adobe Photoshop or Lightroom.
If you are unsure whether you’ve lost those details, look at your histogram. If there is a heavy spike to the far right or the far left, it means a large part of the image is completely white or black. Generally speaking, you’ll have some absolute white and absolute blacks in an image, but what may look black is actually a dark gray and a white area could be an off-white. The details there mean you have something to manipulate and adjust in your post-processing.
Graduated Neutral Density Filters
Before the digital wavefront broke the barriers wide open as far as what you can do with an image after you’ve taken it, you had to find other ways to get the shot you envisioned. When it comes to landscapes, getting the skies and the ground to come out exposed correctly has never been an easy task. Besides the sunrise, golden hour, and heavily diffused cloudy moments, the skies will always be too bright leading to an underexposed foreground.
With a graduated ND filter, you can effectively have two different exposures in one shot by putting a piece of glass that gradually gets darker from top to bottom or bottom to top. When you move the darker portion over the bright part of the scene, the difference in lighting and the contrast is reduced dramatically. Even with what you can do in post-processing, I still carry around one of these things and they do wonders for my shots.
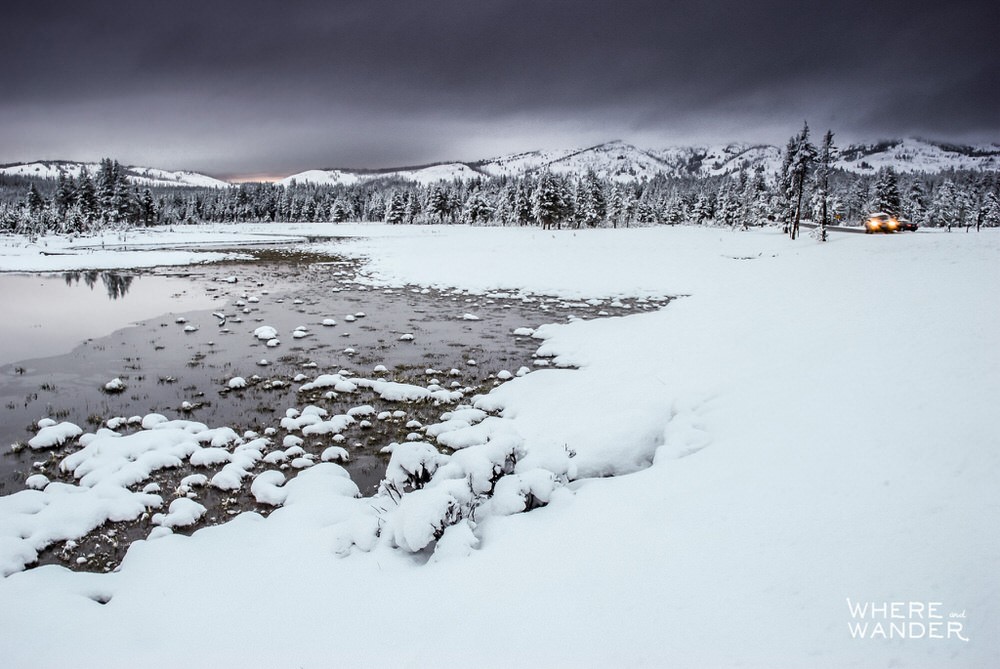
With this shot, I added a graduated ND filter to bring down the exposure in the clouds.
These things can be quite cheap or really expensive, so choose what works for your budget. The downside to the cheaper option is that you’re not getting the best glass, which can affect colors and potentially degrade the quality of an image. Do I personally think it matters? Not so much, I think there’s enough you can do with post processing that it’s worth saving a few hundred dollars over. Save your cash, unless you’re earning a lot of money from shooting these landscape shots.
Train Your Eyes
Since LCD screens on digital cameras allow you to quickly review your shots and make adjustments, many people don’t take the same amount of time to think about exposure like before. I’m guilty of doing the same. I’ll meter and get close to what I think the exposure should be and then take a shot. If it doesn’t need just right, I’ll make a minor adjustment and get the correct exposure in no time. I don’t use Ansel Adam’s zone system, I don’t use a gray card or even look at the histogram all that often. I’ve accepted this and don’t think it makes me any less of a photographer.
Since this seems to be the way forward, I’ve train myself to really look closely at the LCD screen. I compare the brightness of an image that I see on the LCD screen with the full resolution image on my computer and I make note of the difference. I do the same when it is bright out and its hard to see the images on an LCD. There have been times in the desert where I can hardly make out the exposure of an image because it is so bright out.
Through experience, I am able to feel more confident about my exposure by comparing the contrast and bright spots against a mental catalog of images I’ve shot in similar conditions. The same goes for being able to see if an image is in focus or just slightly out of it, even on such a small screen.
There’s more all of this, but this should give you a handle on understanding how to get better if not perfect exposures. Now we can move on to the fun stuff that separates a great travel photo from just a snapshot. We’ll start with People and Portraits.
Updated on May 28, 2024


[…] This is the second in my series of write-ups on “How To Take Better Travel Photos”. In this series, I’ll explain my philosophy and etiquette for how to take better shots of people you encounter on your travels, whether they are locals in their natural environment or just interesting looking people. If you need a refresher on the basics, start with Exposure. […]