Behind The Video: Earth // Around The World From Above
Behind The Video: Earth // Around The World From Above
Like most other travel photographers and filmmakers, I’ve been grounded for the last couple of months, while the world tries to move forward in daily changing ways. It’s been almost exactly 10 years since I quit my finance job to travel the world. That break was meant to last for a year, but the idea of creating a life where I could continue to roam the globe and capture its beauty and stories was irresistible – I haven’t stopped. Until now.
The Great Pause
On March 2, I completed a 4 month trip starting in Mexico and ending in Iceland. I flew to LA from London and have been here ever since to be with my family. With all my travel jobs on hold or cancelled, I looked to my footage from the latest trip and my archives to continue to create. With time on my hand, I created a roadmap of about 15 projects to be edited.
“Earth” started with a quote from F. Scott Fitzgerald.
“So we beat on, boats against the current, borne ceaselessly into the past.”
It’s the last line from The Great Gatsby and one that from time to time surfaces in my thoughts. The melancholic tone of continuing to move forward, while in some way being pulled and influenced by the past feels very appropriate for the collective experience we are all going through. Everything is a little topsy turvy and uncertain right now, but at the same time, this “pause” in our normal lives is giving some us a chance to reflect on how to approach tomorrow – perhaps with a lesson or two learned along the way.
Time Is Nothing
As far as this short film is concerned, I found it interesting that nearly a decade ago, I released a travel video called “Time Is Nothing” that opened up so many opportunities for me to be where I am today. The concept was simple. I compiled together a montage of timelapse footage taken from my year of travel spanning 17 countries. To the viewer, you were transported to a different place in the world every couple of seconds and for me, it was a reminder of the incredible places I was lucky enough to see with my own eyes.
As a throwback to that video, I wanted to create another short film that did something similar, albeit with technology that I could not have imagined having access to back in 2010, like my drones. With “Earth”, I wanted to show some beautiful places around the world – from the air.
We are more or less locked down right now, but the world is out there, and some of these breathtaking spots in nature are actually getting a breather from everyone staying home. This is a reminder of that and the hopes that we will be able to get out there again in time to appreciate what mother nature has created for us. If nothing else, perhaps this can take people’s mind of some of the negative news to watch something a little more positive.
Oh The Places You’ll Go!
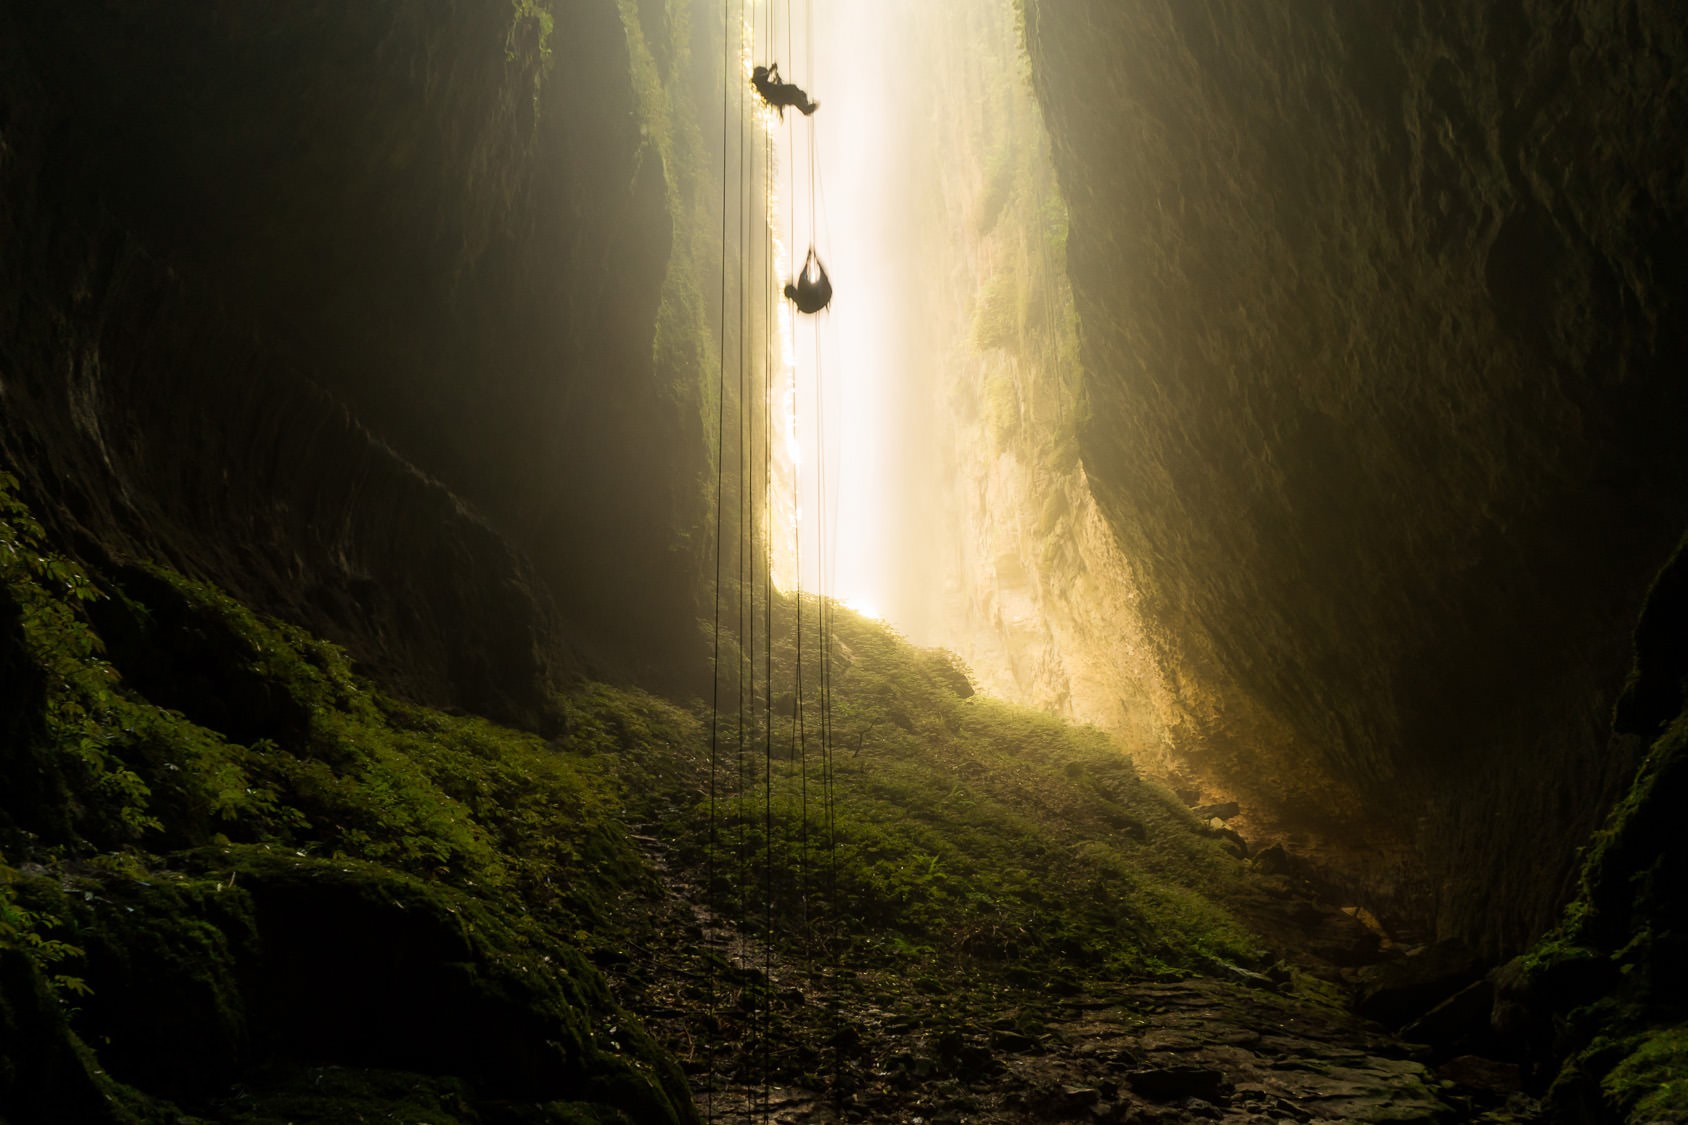
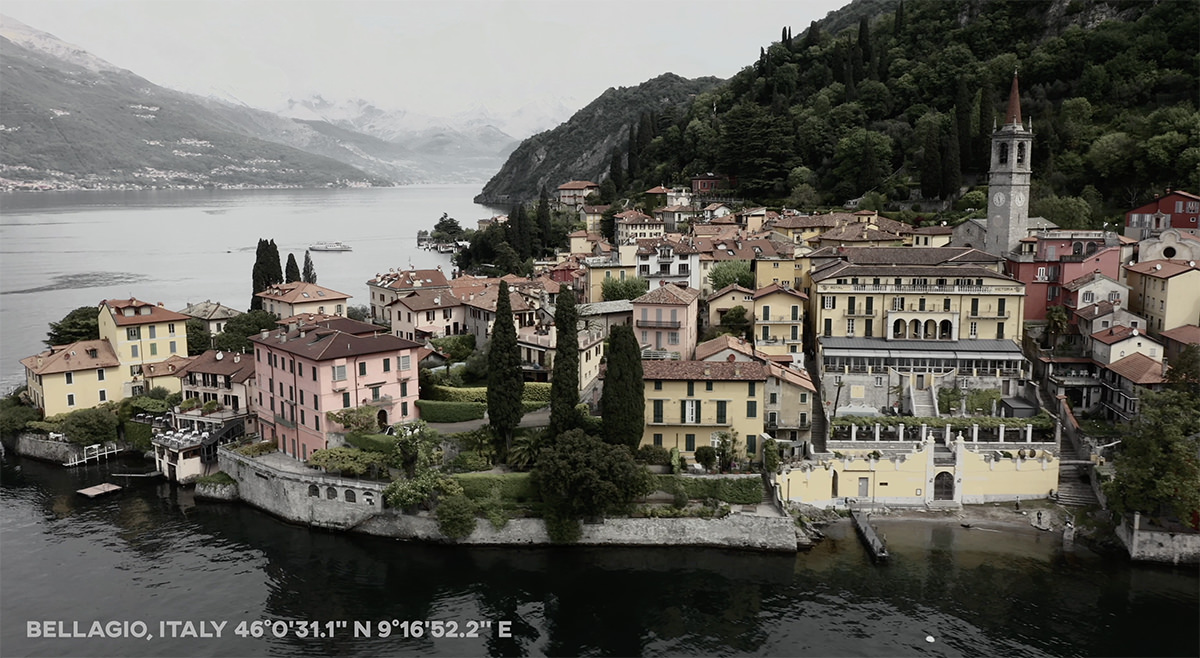
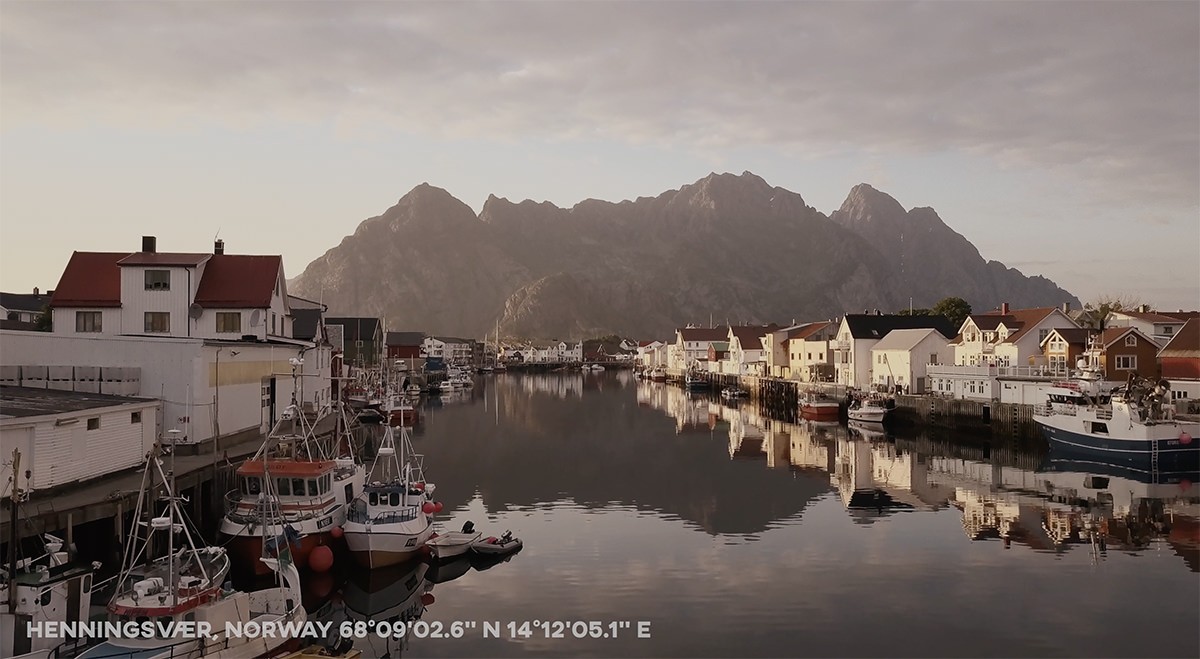
I shot these footages across 3 years and the film includes spots from 14 countries. Like “Time Is Nothing” and its follow-up, “Time And Again”, some might wonder why some countries aren’t included. The short answer is that I wish I could include every country in the world, but I haven’t visited every country in the world. I also didn’t have my drone when I visited some places and in many places, I refrained from shooting if it wasn’t allowed. (Admittedly, in a couple of places, I saw the “No Drones” sign after I had finished shooting).
I also selected footage that showcased nature and places where we built into the environment to preserve its splendor. There’s two scenes in there that deviates from this, and I put it in as a momentary contrast from all the scenes before and after.
As I was selecting and editing, it only made me more excited about the prospect of getting out there and returning to some magnificent places I’ve visited to capture it with an aerial vantage.
GPS Coordinates
I love GPS coordinates and have made it a habit to note down the longitude and latitude data for the exact spots that are special to me around the world. Thanks Google. It’s also incredibly convenient that our devices can capture this data along with a shot. Stylistically, I’ve always wanted to include it in some way in one of my films, but I was also a little conflicted about it because I’ve seen the effects of Instagram’s popularity and geotagging turn some spots into hotspots and then into tourist nightmare zones.
Places that were hardly visited a few years ago are now overwhelmed with people wanting to see and take the exact same shot as their favorite Instagrammer. I have my opinions on this, but at the same time, I do think the beauty of the world is to be shared. Most of these places aren’t a secret and I can only hope that visitors will treat it with some respect if they choose to visit.
What Drone Did I Use?
As someone who likes to travel light, I had to turn a blind eye to the earlier drones like the DJI Phantom because I didn’t want to lug it around. I also wanted to make sure the technology was sound enough that it wouldn’t fall out of the sky and hurt anyone. When the DJI Mavic Pro came out, it was perfect and I jumped on it. It was small enough that I could throw it my camera bag along with my camera and lenses and easy enough to use that I could add incredible aerial footage to my travel films. Some of the shots were taken with this drone.
When theMavic 2 Pro came out, I had to bite the bullet and upgrade because of the 1” sensor and a Hasselblad camera. It was the best decision I could make and the different in quality is night and day. There’s so much more detail in the 4K footage, very little noise and artifacts. I didn’t mind the footage from the original Mavic Pro at the time, but when I compare it with the Mavic 2 Pro and the amount of work I have to do to make the former “work”, I’m so happy I upgraded.
I’ve been tempted by smaller drones and I’m excited to see what the Mavic Air 2 footage will look like, in an even smaller form factor than the Mavic 2 Pro, but for now I’m gladly sticking with what I have.
How Did I Edit and Grade The Film?
This part can get a little technical, but I’m sure some filmmakers will appreciate it. I edit in Final Cut Pro X. Adobe Premiere is great too, but I’m more accustomed to FCP X and for what I do, I edit faster in FCP X. It’s a one stop editor for me and I use it with some useful plug-ins that allow me to quickly edit and color grade.
Everyone has their way of editing, but my workflow looks something like this.
Editor Secret: I use a device called the TourBox to speed up my process from start to finish. It’s a little console about the size of my hand that allows me to map all sorts of different shortcuts into different button and wheel combinations. It’s extremely useful in Final Cut Pro X, or any editor, but I also use it to speed up the long, slow process of finding music.
Find Music
I’m one of those edit-to-the-music type of people. For some projects, I will work with my brothers or other composers to create a unique track for the film I have in mind. For most other projects, I just use a subscription service that allows me to license music that does not infringe on any copyrights. For “Earth”, I found a track on Artlist by Tristan Barton called “Revelation” that really resonated with me.
Currently, my two go-to services are Artlist and FyrFly. They both offer yearly memberships for $199 that allow you to access their entire library. Both have their selling points, but most importantly, I don’t have to worry about any copyright notices with these songs.
FyrFly has a good selection that you can filter by Genre, Mood, Vocals, Instruments, Track Length and Tempo. They also some famous songs from artists like Bruno Mars, The Lumineers and Joshua Radin, for example, that you can pay $10 on top of the subscription to use.
Artlist allows you to filter by Genre, Mood, Video Theme and Instrument. I actually like Artlist more mainly because all their songs have an unlimited license that includes Personal and Commercial use. This is great when I need to source music for clients and don’t want to deal with more complicated licensing. If you plan on subscribing to Artlist, you can use this link to get 2 extra free months.
Are they perfect? No. It can take a while to find the right song, but I’ve been able to get some a lot of good tracks for my projects from these two sites.
Is there a shortcut to find good music? Not really. Once every month or so, I will sit down and filter for a couple of different moods/style/tempo and go through each one one by one. I will flag the ones that I see potential for projects and then either download them or save them for future downloads. Sometimes, I’ll do this process for a specific film since listening to different songs will also give me ideas.
I use the TourBox to speed up this process by mapping all the shortcut functions into a Chrome/Safari preset. I use the knob to scroll quickly through a song, so I can spend about 5-10 seconds to get a quick feel of the song to see if its worth exploring further. The arrow keys allow me to move to the next song and the top button on the TourBox allows me to pause and play. The dial is used to scroll down through the page to load more songs. With the TourBox, I save a lot of time by being able to scroll through the songs and move on to the next without using the mouse or keyboard. I only use the mouse now to add it to my cart.
One Second At A Time
For these types of videos, I don’t always have a complete plan beforehand. I might have a clip in mind for the beginning or the ending, but that’s about it. As I’m listening to the track, I find inspiration and start to lay down the footage a few seconds at a time, editing to the tempo and beats. Once I lay down a clip, I go back 5-10 seconds and watch it again to make sure it flows. Sometimes, I’ll even do a quick color grade so I’m sure I can make that clip work with the clip before and after. If I do this, I’ll just deselect the effect, so that it doesn’t render and re-render whenever I move things around.
By the time I’ve finished a video, I will have watched it in parts and its entirety at least a hundred times or more. The TourBox comes in handy here too because I’ve mapped almost all the shortcuts I use in FCP X to the console. The most useful features are being able to scroll back and forth quickly and to zoom in and out of all the interfaces without having to use a keyboard. This is by far the biggest time saver when I have to scroll back and forth to double check my syncing and to zoom in to make frame by frame changes.
I have quick shortcuts to set in and out points, speed ramp points, change footage to 40% slow motion and to copy effects from one clip to multiple clips. These things can be done with a keyboard, but it’s faster and easier to remember on the console while using less keys.
Transitions and Effects
I treat each project as also a learning experience to use what I know and to learn new technique. For this one, I kept it quite simple and used some quick zoom in effects and cross dissolves to transition smoothly between clips. What I use depends on how the clips connect. Are they following the same camera movement? Did I go from a pan to a top down shot? Is it a series of forward moving shots?
These are the things I think about to select the sequence of the clips and to add any necessary transitions or effects. In this film, I happened to like the flow of the music track and would find clips that would work with the speed of each section.
For most of my short films, I also tend to use speed ramping a lot, which allows you to speed up and slow down sections of clips. It’s a great way to help make the footage flow with the music. Normally, I would shoot in 60 fps so I can also create slow motion footage, but with the drone, I shoot everything in 24 fps and speed things up in post-production when necessary.
Quick tangent. In “Shed”, I shot and edited the project in 2 days. We had a rough idea for the choreography and the film, but the end result was completely different – for the better. And it all happened in post-production, when I realize that our rather spontaneous changes during the shoot left me with footage that would not fit with the original idea. Instead, I found a song that I really liked and edited the dance to the new music. The track itself ending up inspiring me to create an after-image effect and geometric negative effect to match the synthesized noise and cadence. I highly recommend trying this method of edit if you have the time and see what you can come up with.
Since all the drone shots have no audio, I use sound FX to recreate the ambient sound you would expect to accompany the scene. Surprisingly, I was able to use the FX that were in FCP X already for this project, but you can also get a subscription to more effects on Artlist.io as well.
Color Grading
To edit the colors, I use a combination of FCP X’s Color Board module and two plug-ins I’ve purchased over the years. Color Finale and Cinema Grade. I’ve played with Da Vinci Resolve, but I can say that unless you do color grading for a living, a plug-in like Color Finale or Cinema Grade will save you so much time. You also don’t have to leave FCP X since they open up within the editing timeline. Without going into too much detail about the programs and plug-ins, specifically, here are my tips and thoughts for grading.
There are quite a few ways to get a final look with grading and it depends on what the initial footage looks like. Don’t be discouraged or overwhelmed by some of the tutorials out there. If you are shooting in some kind of log or RAW, most people can just apply a LUT (look up table) to quickly get to a baseline look that brings color, contrast, and saturation back into the flat image. You can also just do it all manually, copy the effects to other clips and make fine tune adjustments.
I approach film color grading as a photographer. With Adobe Lightroom, I’m used to curves and sliders rather than color wheels. Grading for film is different, but with Color Finale and Cinema Grade, it much more resembles the way I would edit photographs. FCP X’s color module has come a long way too and instead of the color wheel, I often find myself using just the Color Curves and the Hue/Saturation Curves.
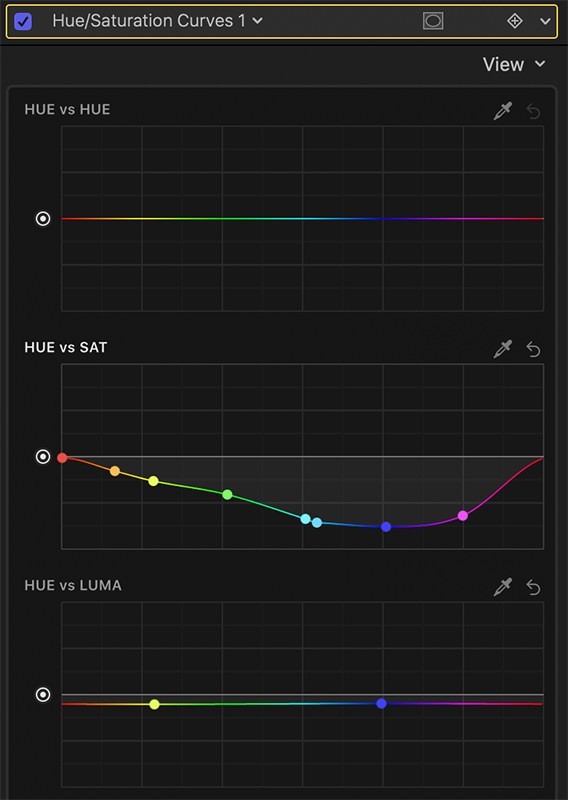
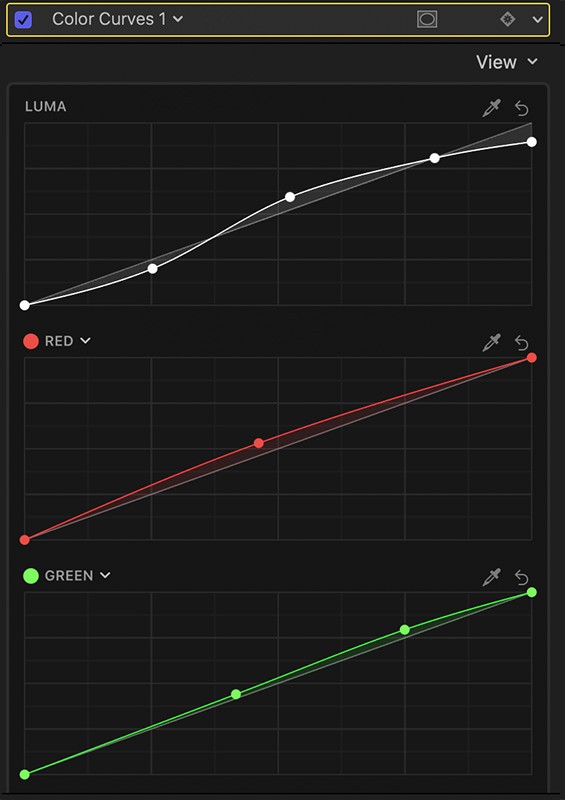
Cinema Grade is the closest thing to editing like in Lightroom and it has a way of editing a batch of similar looking shots and quickly fine-tuning. Every shot in “Earth” was edited using the Color Curve and Hue/Saturation Curve built into FCPX and a few had an additional adjustment using Cinema Grade.

Noise Reduction
This is my last step to get the best image possible. I use a plug-in called Neat Video that will quickly clean up the noise in a shot. This was necessary for almost all the shots from the original Mavic Pro and some shots from the Mavic 2 Pro were the ISO was 200 or 400. I don’t know how it works, but it really cleans up the noise without smudging or degrading the image. This step can be processor intensive in the rendering, so I usually save it for last and move the effect to the top, so it applies the de-noise before the color grading effects.
So We Beat On
I hope you’ve enjoyed the video and find the information here useful. If there’s anything else you want to know, just drop me a comment or send me an email. I’m appreciating this “pause” to edit more of my footage and to spend time with family. When it’s time to safely get out there again, I’ll be excited to continuing checking things off my Bucket List. If you are interested in seeing more of my work, check out my Films page or follow me on Instagram. I’ll post editing tips on there through my stories.